
Dead Frontier Survival 599: Secronom Bunker
COURSE SYLLABUS
A. DESCRIPTION
This course is designed to aid graduate students at Secronom Bunker, where they will explore the surrounding Black Zones and make loot runs into nearby and more dangerous White Zones.
B. OBJECTIVES
- Develop skills to face threats in Black and White Zones.
- Complete postgraduate build up to Level 95-105.
- Acquire third 120-proficiency weapon.
- Complete postgraduate requirements for Master's Degree in Scientific Minimalism
- Prepare for move to Wastelands.
C. TOPICS
This course will cover the following topics:
- Secronom Bunker - Overview
- The Journey to Secronom Bunker
- What Next? Planning to "complete" a postgraduate build
- A Few Words about Secronom Bunker
- Secronom Bunker Zombies
- Secronom Bunker Looting Weapon Analysis
- Looting around Secronom Bunker
- Secronom Bunker Grinding Weapons
- Grinding around Secronom Bunker
- Boss Hunting Near Secronom BUnker
- Missions at Secronom Bunker
- Secronom Bunker Summary
- Completing the Masters Program
D. PREREQUISITES
- Survival 490: Fort Pastor
- Scientific-Minimalist Guide to Builds
- Scientific-Minimalist Guide to Boss Hunting: Burning Zombies
- Scientific-Minimalist Guide to Boss Hunting: Titans
- Scientific-Minimalist Guide to Boss Hunting: Mothers
- Scientific-Minimalist Guide to Weapons: Grenade Launchers
- Scientific-Minimalist Guide to Boss Hunting: Wraiths
- Scientific-Minimalist Guide to Boss Hunting: Giant Spiders
- Scientific-Minimalist Guide to Boss Hunting: Black Titans
E. REQUIRED READING
- Boss Hunting: Flaming Long Arms
- Boss Hunting: Flaming Rumblers
- Boss Hunting: Flaming Flesh Hounds
- Hunting Boss Pairs
- Boss Hunting with Explosives
- Group Boss Hunts (to be completed)
- Secronom Bunker Missions
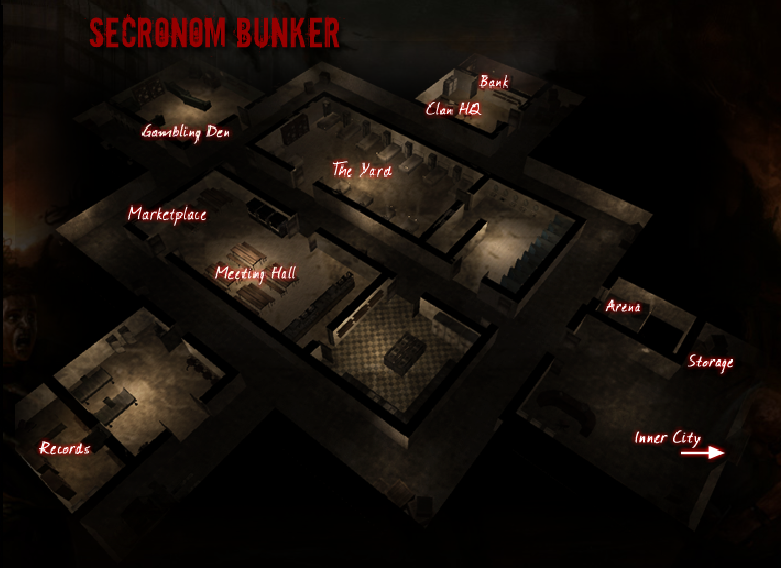
SECRONOM BUNKER - OVERVIEW
A radically different environment awaits graduate students in Secronom Bunker. Whereas previous outposts were a bit like launching pads from which began long treks toward distant looting opportunities, and it was possible for cautious students to avoid danger by staying close to home, Secronom Bunker is right in the middle of the action. Simply stepping outside is an invitation to danger, but that danger is worth the risk because of the lucrative rewards, in terms of money and experience.
Analogy: Secronom Bunker is like a Return to Nastya's Holdout
The best analogy we can draw is between Secronom Bunker and Nastya's Holdout. That may sound absurd, but graduate students will find themselves in a situation roughly comparable to that which they faced as freshman: unable to dominate their surroundings, they will have to learn to cope as best they can, using guile and strategy to navigate the jeopardy.
To put this in concrete terms, recall what it was like wielding a tiny pen knife against a Fat Male Zombie in the Blue Zones near Nastya's Holdout: it took at least four hits to kill the target - and probably more. A grad student using a 105-proficiency Wakizashi against a Black Rumbler near Secronom Bunker will also need at least four hits - and probably more - to kill the target.
The difference is that, in Nastya's Holdout, it was possible to quickly level up and equip weapons that would kill local zombies with a single hit. In Secronom Bunker, graduate students will level up slowly, and weapons that can one-hit-kill local zombies are so prohibitively expensive they may as well not exist.
Does this mean Secronom Bunker is a no-win situation for all but the most advanced students? Not at all. Just as freshmen learned to survive in Nastya's Holdout even before they could afford premium weapon, so will grad students in Secronom Bunker.
THE JOURNEY
As the crow flies, the distance from Fort Pastor to Secronom Bunker may be shorter than that from Precinct 13 to Fort Pastor; however, students will not be able to walk a straight path to Secronom Bunker, because several dead ends will require detours along the way, making this the longest outpost-to-outpost journey yet.
Graduate students who have packed some food and meds should have little trouble covering the distance. Some nails and wooden planks are a good idea in case there is a need to create a personal outpost along the way.
The path will take students through Red Zones and into Black Zones. Not only are there new zombies along the way, the population density is vastly greater, making agro outbreaks even more perilous. The danger lies not so much in the zombies themselves as in lack of experience. A student accustomed to blasting through crowds farther west in Fairview may get in over his/her head during an initial incursion to the Black Zones. It is best to play it safe the first time, adopting a stealth approach instead of risking death and an instant trip back to Fort Pastor just upon the verge of reaching Secronom Bunker.
WHAT NEXT?
Graduate students should spend Levels 51 through 100 at Secronom Bunker, developing the postgraduate version of their build or stat-resetting to a new build if necessary. By Level 50, essential stats should be in place, and students should have at least one and preferably two epic weapons in hand; after that, the development process consists mostly of fine-tuning stats and gradually equipping a third epic-level weapon.
At this point, there is some room to customize a build to suit personal preference, though this will take time since only one stat point is afforded for each new level advanced. Students may simply dump additional points in Endurance, or they may decide they want faster Reloading or Perfect Aim instead of Reliable Aim.
Learn more in the Scientific Minimalist Guide to Builds.
A FEW WORDS ABOUT SECRONOM BUNKER
The most significant aspect of Secronom Bunker is that the outpost is not merely in close proximity to the End Zone; it is literally in the Northeast End Zone. Traversing long distances to find loot or fight bosses is no longer necessary. Jaded thrill-seekers can find all the action they want almost literally on their doorstep.
There are some reasons (such as certain missions) to occasionally travel farther afield, but for the most part Secronom Bunker affords students an opportunity to achieve goals with a smaller investment of time, little of which is wasted walking from one place to another. This is a great benefit, but it can also be quite addicting.
SECRONOM BUNKER ZOMBIES
|
Black & White Zone Zombies |
Black Long Arm |
Irradiated |
Flesh Hound |
Black Rumbler |
Irradiated Rumbler |
|
Health Points |
200 |
200 |
200 |
250 |
250 |
|
Damage Per Hit |
55 |
55 Vomit: 110 |
100 |
70 |
50 Explosion: 60 |
|
Calm Speed |
1.4 |
1.4 |
3 |
1.2 |
1.2 |
|
Disturbed Speed |
2.7 |
2.7 |
6 |
2.2 |
2.2 |
|
Enraged Speed |
5.7 |
5.7 |
11 |
4.2 |
4.2 |
|
Experience Gain |
262.5 |
300 |
300 |
285 |
285 |
Key Points:
- Normal Zombies disappear in Black and White Zones.
- New zombies are technically categorized as "Special," but they have as much health as some Mutants.
- Previously seen Special Zombies such as Spiders and Tendrils, spawn more frequently.
- Population density near Secronom Bunker makes agro harder to avoid.
- The relationship between weapon strength and zombie health is roughly analogous to that first encountered by freshman in Nastya's Holdout.
Zombies Near Secronom Bunker
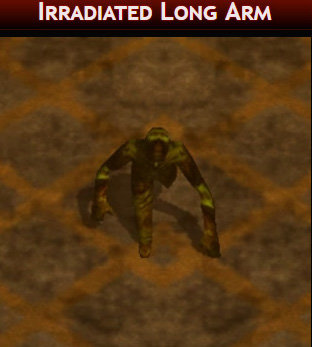 In the Black and White Zones around Secronom Bunker, students will encounter five new species: Black Long Arms, Irradiated Long Arms, Flesh Hounds, Black Rumblers, and Irradiated Rumblers. Though officially categorized as "Special Zombies," these new species are almost as strong as Mutants.
There are no new Mutants, but Sirens, Spiders, Tendrils, Leapers, Brutes, and Bloats spawn more frequently. These older species and the new Special Zombies proliferate to such an extent that Scientific Minimalism designates them "Common Zombies" in Black and White Zones - our term for the zombies most frequently encountered while looting. Their prevalence makes looting and grinding more challenging.
Normal Zombies are virtually non-existent in Black Zones, appearing only during outpost attacks and some missions. Likewise, the Red Long Arms, Red Rumblers, and Blood Hounds, which live in Red Zones, disappear near Seconrom Bunker. Only in the western Black Zones do these species co-exist with the new species.
New Zombies
Except for the Flesh Hound, the new Special Zombies are not particularly fast. Unfortunately, few affordable weapons will eliminate them with a single shot. The difference between needing one shot to kill a zombie and needing two or three is negligible when there is a single target; when there are a half-dozen nearby, it becomes quite significant.
Black and Irradiated Rumblers
- The new Rumblers are slow-moving, easy targets, but they take the longest to kill, during which time other zombies are moving in to attack. Because they explode upon death, Irradiated Rumblers are particularly dangerous to Melee-Chainsaw students.
Black and Irradiated Long Arms
- Black Long Arms live up to their name with their long reach. Likewise, Irradiated Long Arms spew vomit farther than the Irradiated Zombies seen father west in Fairview. Students are advised to keep a safe distance and to keep an eye out for them during agro situations, when they may sneak up while attention is focused on Black and Irradiated Rumblers.
Flesh Hounds
- Speed makes these ferocious canines the most dangerous of the group, but they can be handled with 100-proficiency weapons - or even lower proficiency, if students are careful.
Analogy, Part 2: Nastya's Holdout vs Secronom Bunker
Back in Nastya's Holdout, freshman had to frequently deal with Dog Zombies, Female Zombies, and Fat Male Zombies; in Secronom Bunker, grad students must frequently deal with Flesh Hounds, Black Long Arms, and Black Rumblers. The two situations seems worlds apart, yet there are similarities.
In Nastya's Holdout, beginning freshman learned to survive even when their weapons took several hits to kill the local zombies. The same holds true in Secronom Bunker. In both cases, students had to develop the skills necessary to survive against difficult threats.
The difference is that there is a higher population density near the Bunker, which multiplies the number of hits needed to exterminate group threats. It is a mistake for grad students to think they can easily clear an area with a few gunshots: more often than not, by the time the visible zombies have been dispatched, more will arrive; this can lead to an accelerating cycle of killing each new wave until an agro spike hits. Better weapons will help, but a change in strategy is also useful. More on that after we take a look at looting weapons.
SECRONOM BUNKER LOOTING WEAPON ANALYSIS
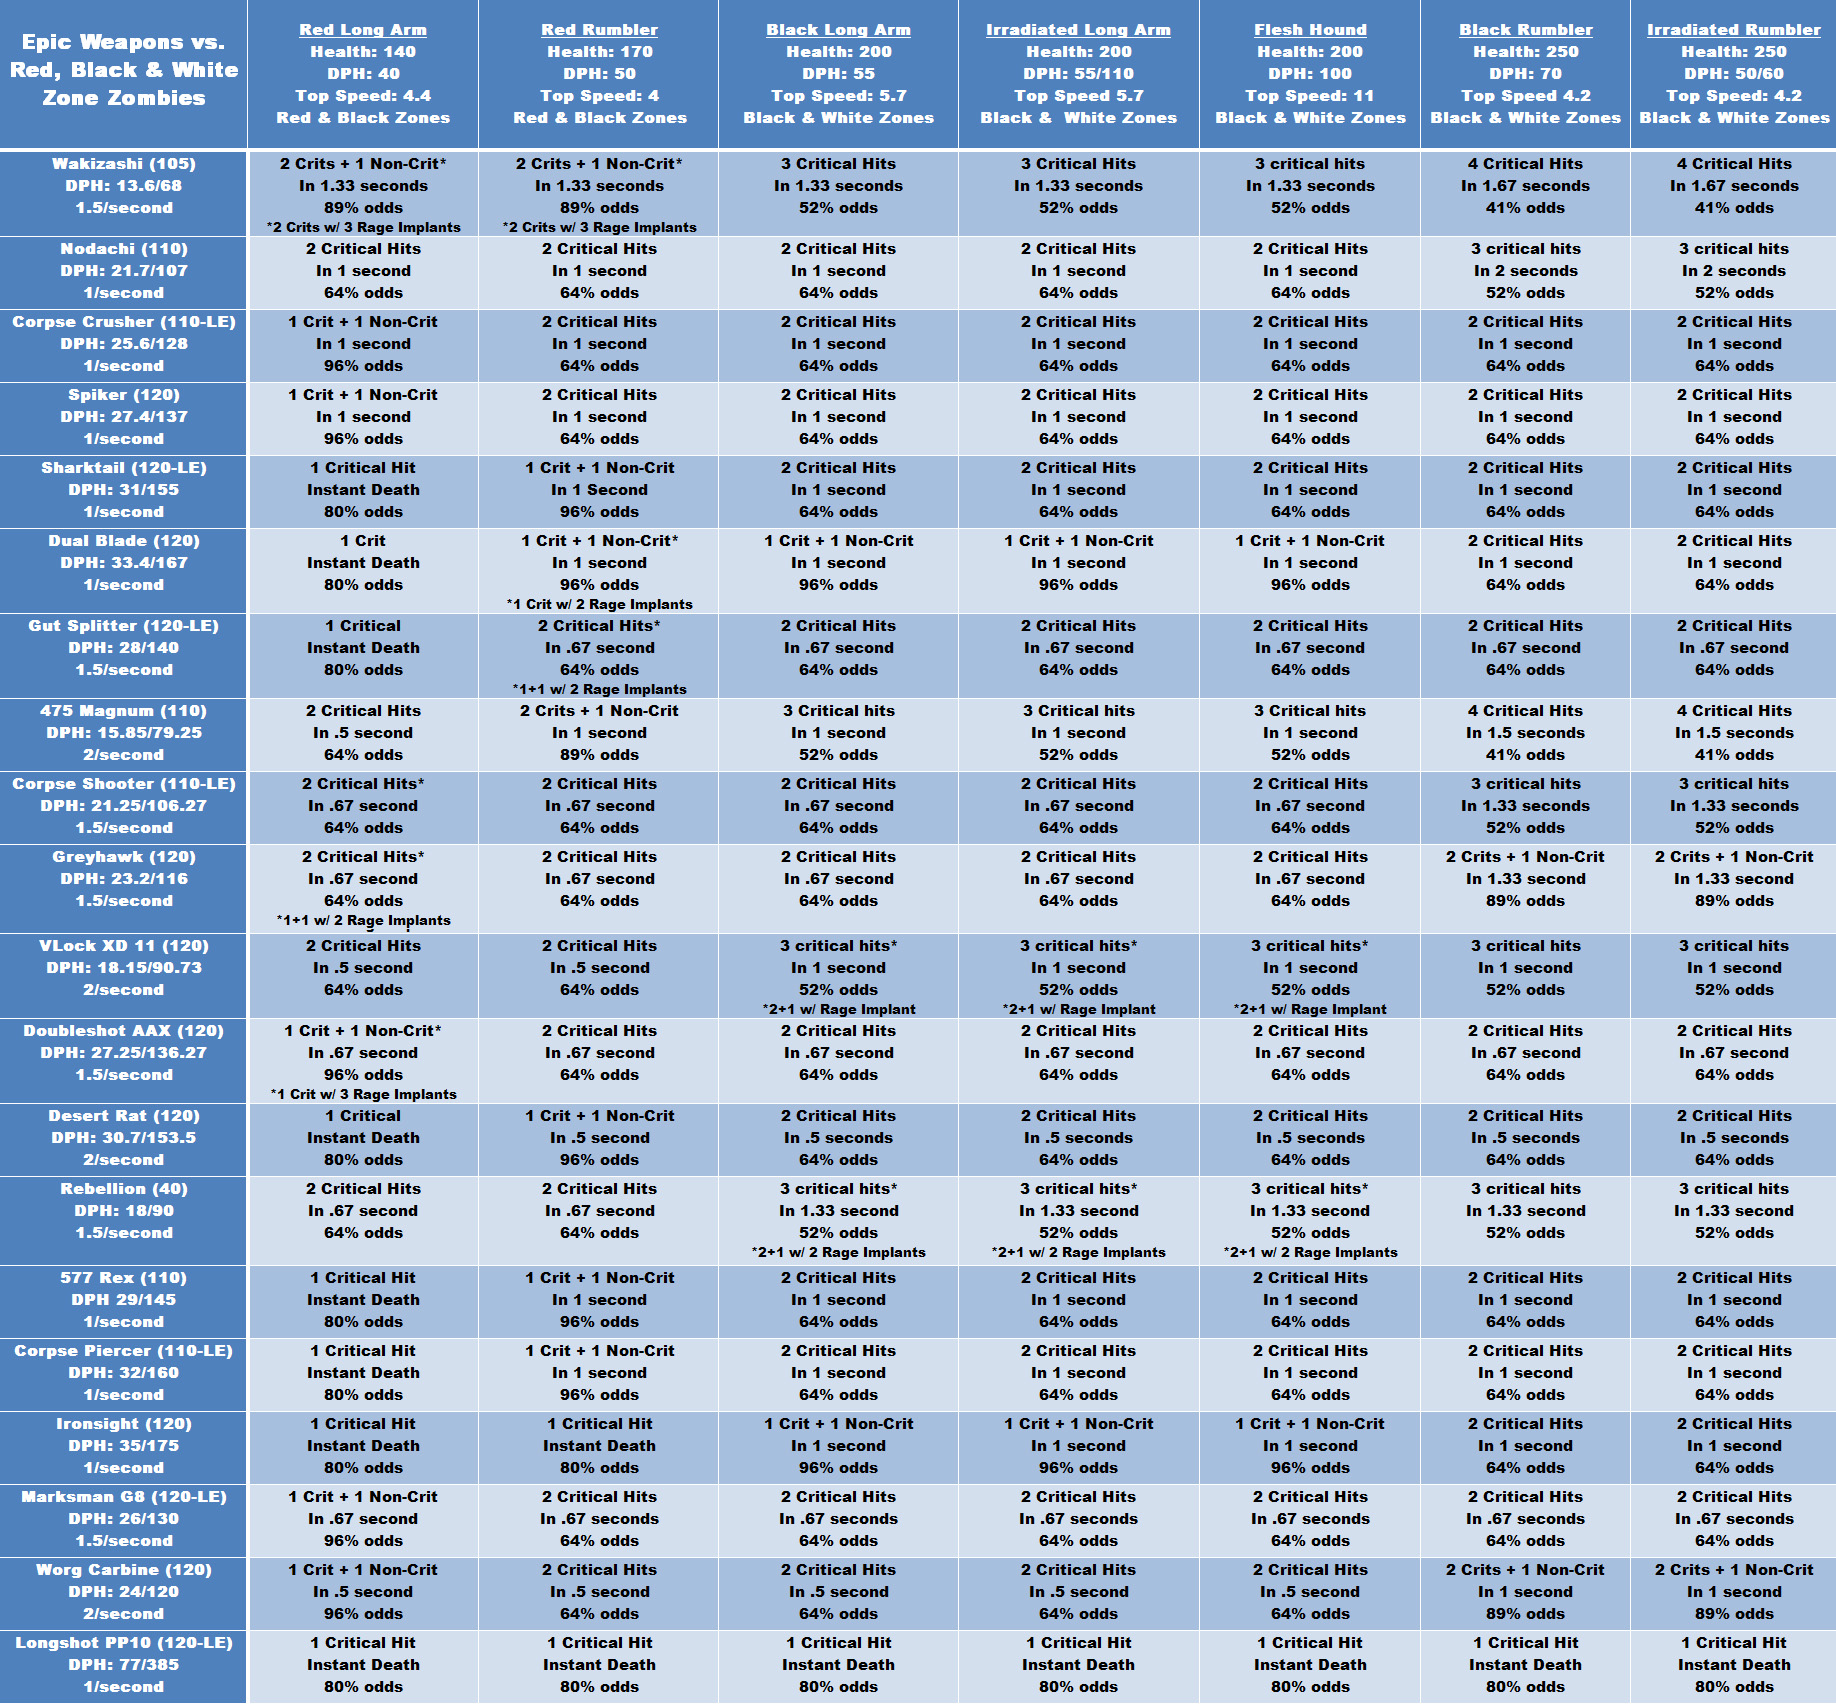
Click to view complete chart.
Key Points:
- Without access to unaffordable, limited-edition weapons, it is impossible to one-hit-kill Common Zombies.
- Nevertheless, there are 120-proficiency weapons that make successful looting possible.
- The silence of Melee weaponry is helpful.
- Faster firing speed is useful for clearing loot spots.
Before getting into looting strategy, let's explore the effectiveness of Looting Weapons against threats near Secronom Bunker.
The above chart shows how many shots Epic Level weapons need to kill the common zombies in Black and White Zones. We have excluded Dusk weapons, which most students will not be able to obtain, but we have included some Limited Edition weapons. We have also included the "unique" (i.e., unlootable) Rebellion rifle because, although its proficiency (40) is well below that of Epic Weapons, its performance outmatches that of the 105-proficiency Wakzashi.
While assessing the time needed to kill a zombie, it is helpful to recall that weapons deliver their first blow or shot instantly. Thus, a Nodachi, striking once per second, can deliver 3 blows in 2 seconds to kill its first Black Rumbler; however, it will take 3 seconds to deliver 3 more blows to kill the next Black Rumbler and 3 more seconds to kill the one after that, etc.
Also keep in mind that an optimized looting weapon delivers Critical Hits 4 out of 5 times. If a weapon requires 4 Critical Hits to kill a particular species of zombie, the odds are that it will take 5 blows or more to deliver those 4 Critical Hits. Thus, a 475 Magnum can theoretically kill a Black Rumbler in 1.5 seconds, more more often than not it will actually take 2 seconds.
Rather than placing all weapons in order of Proficiency or effectiveness, we have grouped them according to type: Melee, Pistols, and Rifles.Red Long Arms and Red Rumblers are included because they continue to appear in western Black Zones; however, to squeeze as much information as possible into an easily readable chart, we have made some judicious omissions (e.g., if two or more species have the same health points, only one is listed). Click on the chart to open a larger, complete version, which which provides more details for comparative purposes.
General Observations
 All of these weapons are adequate to loot the Red Zones. Some are less satisfactory in the Black and White Zones. For instance, the Wakizashi and the 475 Magnum require 4 blows/shots to kill Black and Irradiated Rumblers. This is a relatively small problem when there is only one Black Rumbler nearby, but the increasing frequency of Black Rumblers in eastern zones presents a genuine difficulty.
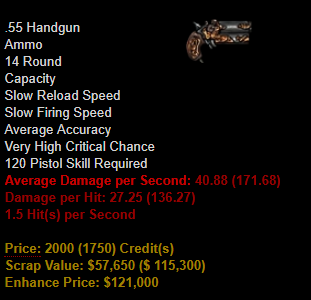
Several weapons (e.g., the Dual Blade, the Doubleshot) can have their performance improved by implants to increase Damage Per Hit. We recommend Rage Implants (1% damage increase) because they are affordable. Violence implants increase damage by 2% but cost 100 times more.
In each class of weapon - Melee, Pistols, Rifles - the top performer is an expensive, limited-edition weapon that is virtually unobtainable for all but the wealthiest students. Otherwise, limited-edition weapons are not necessarily worth the extra expense. For example, the limited-edition Sharktail is not as good as the Dual Blade, so there is no justification for purchasing it except as a collector's item. The Corpse weapons are not top of the line, but they do have the advantage of requiring only 110 proficiency points, which makes them useful for students who have yet to invest 120 points for their tertiary weapon.
Unless students can afford the ridiculously expensive Longshot PP10, they will not have the luxury of one-hit-killing common zombies in Black and White Zones. Fortunately, one-hit-killing is not necessary to succeed in Secronom Bunker. A Marskman G8 rifle or a Doubleshot revolver (which virtually duplicate each other's performance) is more than up to the task. A Dual Blade melee or an Ironsight rifle are also adequate, though their Very Slow Firing Speed make crowd control a little more difficult.
In fact, our clinical trials have shown that Epic Level weapons are not absolutely necessary; lesser looting weapons will suffice. It certainly helps to have a secondary grinding weapon when things get out of hand, but with a little patience and care, students can successfully loot with a Dragon SVD, an M82A2, or an Alpha Bull. Of course, as soon as students can afford a better looting weapon, they will never look back.
Recommendations
Melee:
- The silence of Melee weaponry is even more important near Secronom Bunker. It is almost impossible to shoot a few zombies without attracting others, but with a Dual Blade it is possible to clear a loot spot. The Dual Blade has Very Slow Striking Speed, but that's not a problem so long as one is not drawing the attention of nearby zombies. Exploding Rumblers present a problem, but with luck they can be avoided.
Pistols:
- A Greyhawk revolver is adequate, but a Doubleshot is very effective - expensive, but not as much as the limited-edition Desert Rat.
Rifles:
- A Corpse Piercer or an Ironsight will do the trick as long as there is room to outrun the zombies (because the Very Slow Firing Speed of these rifles offers little knockback). The limited-edition Marksman G8 makes looting much easier - it fires just fast enough to give a little breathing room, and it is much less expensive than the Worg.
For more information on how weapons stack up against zombies, visit our page of Weapons Charts, which includes a look at the impact of Damage Boosters.
LOOTING AROUND SECRONOM BUNKER
Key Points:
- Looting is more difficult but more lucrative.
- Scout local areas to find good looting spots.
- Go after low-hanging fruit.
- Be ready to outrun agro swarms until a window of opportunity opens.
Looting around Secronom Bunker is quite a different experience. The danger is greater, but so are the rewards. Elite Level weapons are easier to find, so their value in the marketplace is low compared to previous outposts. The same is true of food, medicine, and ammunition - though of course prices fluctuate from day to day and even hour to hour.
The major advantage is that long journeys are not necessary. It is possible to find good loot in the zones contiguous with Secronom Bunker. In fact, there is decent loot in the interiors of the zone housing Secronom Bunker. Neither weapons nor armour will be found in these place, but there is enough food, medication, and ammunition to sustain oneself.
In general, interior looting is easier than exterior looting, because walls and rooms divide zombies into small groups that can be more easily dispatched in order to reach a loot spot. Students are advised to familiarize themselves with the several high-yield interiors in the surrounding area, such as hospitals, schools, and the abandoned bunker directly south of Secronom Bunker itself.
Looting Strategies
Exterior looting is extremely challenging - the streets are so filled with zombies that the chances of finding an unprotected loot spot are slim. Nevertheless, with a little practice, students can use a couple simple tactics: grab low-hanging fruit and thin the herd.
1) Low Hanging Fruit
Most zones have loot spots near the intersections where students enter. There will probably be zombies nearby, but it is often possible to eliminate them and grab the loot before others show up. If a loot spot is too heavily guarded, exit the zone and re-enter; hopefully, there will be fewer zombies on the second (or third) try.
2) Thin the Herd
Grabbing one or two pieces of loot without drawing attention is the most one should expect, so students should get used to the idea circling the block to thin the herds. When the nearby zombies make it impossible to reach loot spots, run around the perimeter of the zone, firing occasional burst to attract the crowd. After one or two circuits, the horde will fall behind, providing opportunities to grab loot. Zombies will probably catch up after two or three spots have been looted; fortunately, these brainless creatures tend to go briefly docile when loot is discovered, providing a chance to get away. Students will need quick reflexes in case aloot spot turns out to be empty ("Broken Beyond Repair"), so that they can search the spot until the last second before darting away to escape pursuers.
Scouting
Whether students are grabbing low-hanging fruit or thinning the herd, we highly recommend scouting the zones adjacent to Secronom Bunker. Students should familiarize themselves with easy loot spots, such as cars and trucks that will block pursuing agro. Memorize alleyways, parking lots, fields, and courts that can be used to evade or trap crowds, and don't worry about looting every single available spot in a zone. Instead, plan on grabbing loot from spots protected by fences, walls, and other obstacles.
White Zones
Students looting for the best loot will have to travel to White Zones northeast of Secronom Bunker. Even these zones are not very far away; unfortunately, the trade-off for proximity is low probability. Although it is possible to loot epic-level weapons, the odds are very low.
The same rules apply: grab the low-hanging fruit, then thin the herd before seeking other loot. If managing the crowds is too difficult, try looting indoors. Try to pick one or two favorite looting zones and become familiar with their pathways, obstacles, and easy loot spots.
And if none of this works, do not lose heart. Secronom Bunker boss-hunting provides a lucrative alternative to looting, as we will discuss below.
SECRONOM BUNKER GRINDING WEAPONS
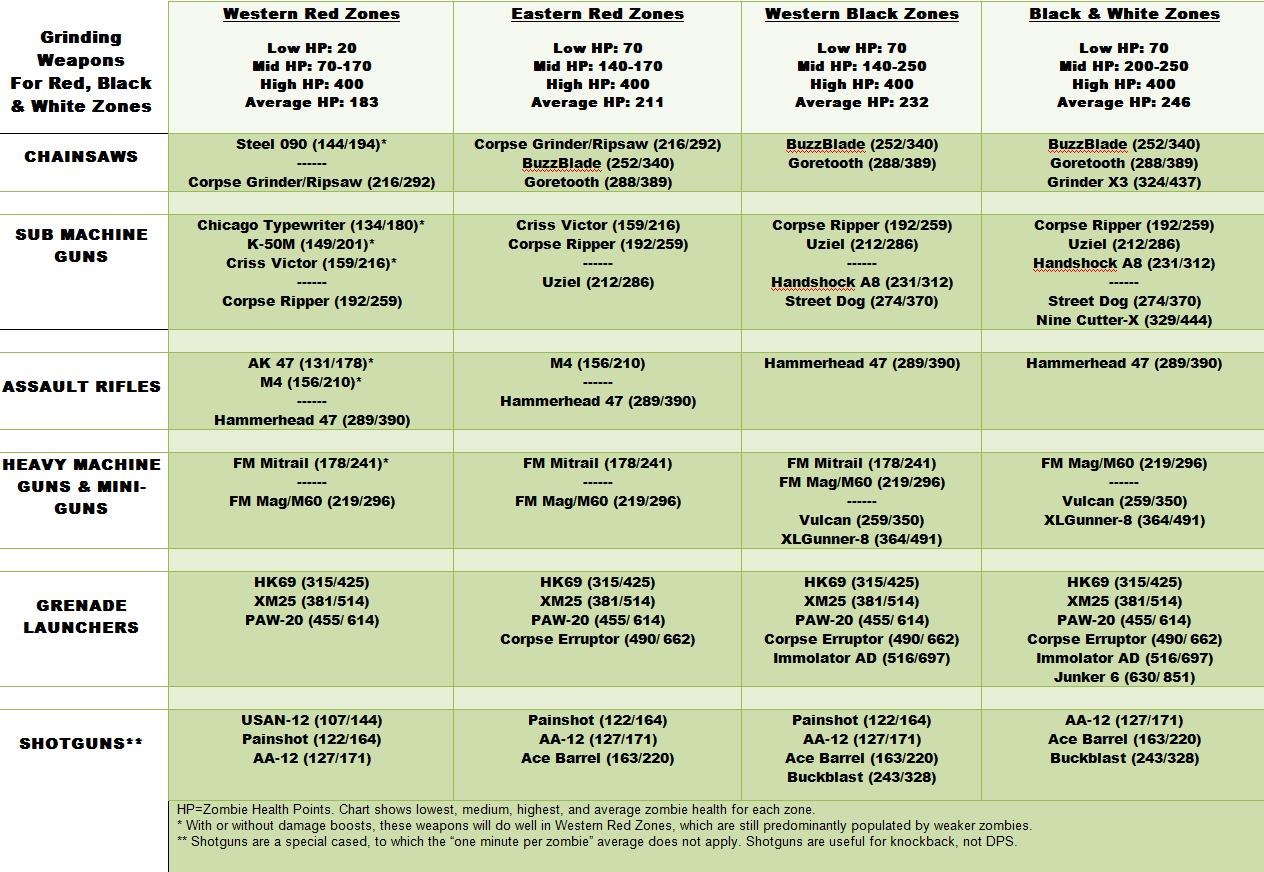
Click for larger version
Key Points:
- In general, try to use enough DPS to kill, on average, every zombie in one second.
- In the case of Shotguns, knockback is more important than DPS.
- Chainsaws are still viable as defensive weapons, but their use for leveling up is limited by the prevalence of exploding zombies.
The chart above shows the health points for weakest, strongest, and mid-range zombies, plus their overall average, in Red, Black and White Zones.
 In general, a grinding weapon with enough Damage Per Second to match the average Health Points of all zombies in the area should be adequate. This translates into taking approximately one second to kill each zombie - some more, some less.
In the categories for Chainsaws, Sub Machine Guns, Assault Rifles, and Mini-Guns, we have separated those weapons that can achieve the desired DPS with and without a Damage Boost. All Grenade Launchers have more than enough killing power. Shotguns are a special case - valued more for knockback than damage.
In the Western Red Zones, where Normal Zombies still proliferate, grinding weapons can still be still effective even if the do not cross the one-zombie-per-second threshold. These weaker zombies disappear in Western Red Zones. In Black and White Zones, it becomes difficult if not impossible to grind with anything less than epic level weapons.
Chainsaws
- The Ripsaw is solid for Red Zones. The Goretooth has enough DPS for Black Zones. The Grinder X3 offers massive DPS, but it is extremely expensive.
Machine Guns
- The Hammerhead assault rifle and the Street Dog sub machine gun are adequate for most exterior grinding. They come up short only in tight situations where more knockback is required.
- The Vulcan provides more knockback but slightly less DPS. It is very useful for indoor grinding in cramped quarters.
- The XLGunner-8 provides great knockback and high DPS - more than any of the three previously mentioned machine guns. Assuming students cannot afford a Gau-19 or a Wraith Cannon, the XLGunner will serve their needs.
Shotguns
- Only the Buckblast can meet our one-second-per-zombie threshold; the Ace Barrel comes close when paired with a Damage Booster. Leveling up will take longer with these weapons, but they are cheaper than machine guns.
- The AA-12 provides awesome knockback, making it a great weapon for defensive grinding.
- The Painshot provides more Damage Per Hit than the AA-12. This is a good intermediary weapon for students saving up for an Ace Barrel.
Grenade Launchers
- Grenade Launchers with Very Slow Firing Speed (HK69, Immolator) work best if students can trap zombies behind walls or fences. For grinding in open spaces, the faster firing speed of the limited-edition Corpse Erruptor at least provides stun, if not knockback.
GRINDING AROUND SECRONOM BUNKER
Key Points:
- In open spaces, Mini-Guns are not necessary; Assault Rifles and Sub Machine Guns will do.
- In confined spaces, especially interiors, the high knockback of Mini-Guns and Shotguns is more advantageous.
- Scout local areas to find good places to grind.
Grinding in the zones near Secronom Bunker is more dangerous than grinding near previous outposts, but the danger pays off in experience gained. Leveling up no longer feels as if it has come to a standstill; once again, it is possible to see experience gains register as increased percentage points during long grinding sessions.
They key, of course, is not to loose those experience points by dying in the field.
Scouting
As with looting, students can take advantage of the fact that it is not necessary to travel far in order to grind; there are plenty of high-experience zombies in the zones around Secronom Bunker.
Scout these zones for good grinding spots, both indoors and outdoors. Several include convenient fences and/or walls. Tennis courts are located in zones one-down from SB, one-right from SB, and one-up-one-left from SB.
Other potential grinding spots are less obvious. For example, just right of the northwest intersection in the zone one-up-one-right from SB, some abandoned cars form a "pocket" that will capture zombie crowds.
Outdoor Grinding
Grinding outdoors remains straightforward. If there is open space, it is relatively easy to fire away, retreating around the perimeter of the area to avoid the horde. Use obstacles to block pursuers, and try to trap agro behind fences or walls.
Generally speaking, the immense knockback of Mini-Guns and Shotguns is not necessary outdoors. Assault Rifles, Sub Machine Guns, and even Explosives will do, as long as students avoid running into obstacles or trapping themselves in dead ends.
Indoor Grinding
Grinding indoors is trickier, because limited space forces students into close-quarter combat. Everyone knows about the dangers of grinding with Chainsaws, but firearms fare little better in many indoor situations. With little room to maneuver, students will often find themselves at arms length from exploding Rumblers and vomiting Long Arms.
Higher knockback is definitely useful in these situations, which usually take place in small offices and shops. Try to find a blockaded area (e.g., behind a long counter) that will funnel the attacking zombies, and blast everything that comes around.
More spacious interiors, such as hospitals and schools, are less difficult. Long corridors provide room to retreat from the horde. Students can hole up in a room and shoot zombies as they come through the door or lob grenades over the wall.
Bunkers are good grinding locations. The layout is like a miniature exterior, with corridors instead of streets running around the perimeter. Students stay ahead of the agro by perpetually circling the area without fear of running into a dead end. Duck into doors if necessary. Trap zombies behind walls when possible.
Chainsaw Grinding
The prevalence of exploding zombies is problematic for students grinding with chainsaws. The weapons can still be use defensively to fend off crowds while retreating.
As for experience grinding, students can use chainsaws during lulls in agro spikes, switching to ranged weapons when the Irradiated Rumblers show up.
Machine Gun Grinding
With high DPS and high knockback, Machine Guns remain the best all-round grinding weapon, effective both in open street fighting and cramped interiors.
In the heavily infested zones near Secronom Bunker, Machine Guns are especially efficacious during the initial stage of an agro spike. With zombies attacking from all directions, students can punch a hole to safety and beat back the pursuing zombies while circling the area to thin the crowd.
After one or two circuits, students can hopefully find a good grinding spot to trap or funnel the horde and possibly switch to a different weapon (e.g., a grenade launcher).
Shotgun & Grenade Grinding
Shotguns are excellent for crowd control but not for leveling up. Students can use them for defensive grinding around Secronom Bunker, but if they want to earn experience to level up, they must be able to afford a Buckblast 99 or at least an Ace Barrel.
Explosives are the opposite of Shotguns: high DPS but no knockback. In order to use them, students need to be able to sprint and dodge. With a Speed Boost, Grenade Launchers are unbeatable; otherwise, students will need to pace themselves so that they do not exhaust their energy.
Shotguns and Grenade Launchers are a good combination for grinding near Secronom Bunker. A student can sprint around the crowd firing grenades until energy runs low, then switch to a shotgun to knock back the crowd while waiting for energy to restore itself.
BOSS HUNTING NEAR SECRONOM BUNKER
|
Red, Black & White Zone Boss Zombies |
||||
|
SPECIES |
HEALTH |
DPH |
EXPERIENCE |
Top Speed |
|
Flaming Long Arms |
20,000 |
110 |
30,000 |
5.7 |
|
Flaming Rumblers |
30,000 |
140 |
45,000 |
4.2 |
|
Flaming Fleshounds |
20,000 |
180 |
30,000 |
12 |
|
Black Titan |
100,000 |
400 |
150,000 |
12 |
|
Flaming Black Titan |
200,000 |
800 |
300,000 |
14 |
Key Points:
- Near Secronom Bunker, boss hunting is predominantly multi-boss hunting.
- There are three new sets of mini-bosses, which spawn in quintuplets.
- Familiar boss zombies appear in pairs.
- Only the two most powerful zombies show up alone.
- Boss zombies frequently spawn in zones adjacent to Secronom Bunker, making boss hunting very convenient and lucrative.
- It is possible to survive on loot from boss hunting.
- Extreme agro can make it difficult to focus firepower on boss zombies; high knockback is more important than before.
- Defeating the faster bosses is very difficult, requiring top-tier weapons, high-end armour, maximum endurance, speed boosts, multi-party boss hunting, or a combination of all these.
- Faced with more intimidating challenges, group boss hunting becomes a more appealing option.
Overview
As with grinding, boss-hunting in the zones around Secronom Bunker is more challenging but also more rewarding. The more dangerous boss zombies yield greater experience gain for leveling up, and multi-boss hunts result in more loot - so much so, that traditional looting becomes almost unnecessary.
Students will encounter both old and new boss zombies. Familiar foes tend to spawn west of Secronom Bunker, usually in Red Zones. New bosses appear farther east, usually in Black and White Zones close to the outpost. Only Black Titans and Flaming Black Titans appear alone; other bosses spawn in groups.
The Scientific Minimalist approach still works against slower bosses. Students do not need a Gau-19 to hunt Mothers, Titans, Flaming Long Arms, or Flaming Rumblers.
Faster bosses are difficult if not impossible to defeat without maximum firepower. Students can no longer rely on dodging skills to compensate for mid-level weapons. Speed boosts can provide the necessary edge to survive, but drug boosts are expensive, and the costs add up over time. This leaves students with a dilemma: either spend a fortune on drugs gradually or spend a fortune all at once on a Wraith Cannon.
General Strategy
The basic strategy remains the same: circle the block to thin agro, and use walls or fences to isolate bosses from the crowd.
Because agro is so intense, and local zombies are so resilient, it is generally a good idea to begin boss hunts with high-knockback grinding weapons. It is possible to switch to precision weapons when agro has been left behind or trapped, and the bosses have been separatd.
Group boss hunting is a helpful option for students who do not feel confident about their solo boss-hunting skills. There will often be be a crowd of hunters when bosses spawn near Secronom Bunker. Let more advance students inflict the majority of the damage with their mini-guns; focus your firepower on wounded zombies.
Hunting Boss Pairs
 Hunting boss pairs should not be entirely new to graduate students. In Fort Pastor, the goal of Mother Lovin was to exterminate two Mothers. Students who completed that mission will have little trouble tackling pairs of Titans, Mothers, Wraiths, and Giant Spiders in Red Zones west of Secronom Bunker.
The strategy involves a variation on the basic "circle the block" technique, used to thin agro. In this case, students not only retreat around the perimeter of the area; they squeeze through as many tight spaces and dart down as many alleyways as possible, sticking as close to walls and obstacles as possible.
The goal is to split the pair or at least slow one down. Unload as much firepower as possible to seriously wound or hopefully kill the first boss before the second shows up. Once the first boss is dead, what remains is essentially a solo boss hunt, which can be completed with a good looting weapon and skillful dodging.
The same strategy can be used against Flaming Titans, Flaming Wraiths, and Flaming Giant Spiders. However, the speed of these bosses makes it nearly impossible to defeat them without high-powered grinding weapons, Speed Boosts, and/or help from other hunters.
Hunting Mini-Bosses
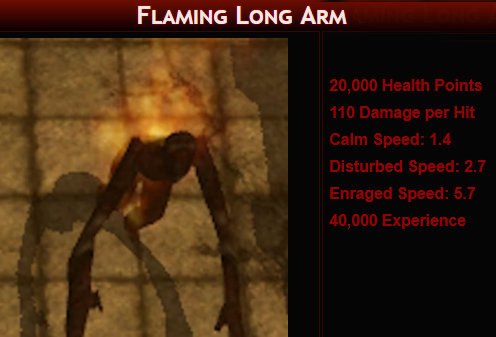 There are three new mini-boss zombies (which we call Black Zone Mini-Bosses): Flaming Long Arms, Flaming Rumblers, and Flaming Flesh Hounds. These spawn in groups of five, each one of which drops loot upon death.
Flaming Long Arms and Flaming Rumblers are easy to hunt with the "circle the block" strategy. Flaming Long Arms are easier because they are fast enough to outrun the crowd. Flaming Rumblers, being slower, sometimes lag behind and get lost. A looting weapon will do the job: Marksman, Doubleshot, Dual Blade.
Flaming Flesh Hounds are extremely difficult because of their speed. High knockback is essential during the initial engagement if there is to be any chance of thinning the agro. A Vulcan mini-gun can just about do the job if you have enough ammo and if you carefully time your sprinting to avoid exhausting your energy. If the Flesh Hounds can be isolated from the horde and from each other, they can be held at bay with a good looting weapon (Marksman or Doubleshot). A single Flesh Hound can even be ground to death with a chainsaw. It is best to hunt these mini-bosses in groups or to use a Speed Boost for solo hunting. Mini-Guns are recommended.
Because Black Zone Mini-Bosses yield up to five loot items, hunting them can be very lucrative. Use looting weapons to save on ammo costs. It is not out of the ordinary to gross over $100,000 from scraping the loot after these hunts.
Black Titans & Flaming Black
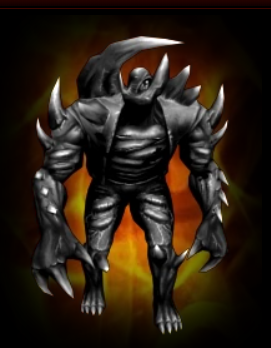 Black Titans and Flaming Black Titans are the only boss zombies that spawn one at a time. Both spawn in the eastern regions of Fairview, including the Black and White Zones around Secronom Bunker. The Black Titan also spawns farther west, showing up not only in Red Zones but sometimes Orange Zones as well.
Black Titans and Flaming Black Titans are so fast and powerful that they will run through machine gun fire as if it were a light breeze. Our best advice is to use Speed Boosters and possibly Damage Boosters.
With a Speed Boost, students will be able to outrun the targets and use looting weapons that deliver maximum Damage Per Hit, thus saving ammunition. We recommend the Ironsight or, if one can afford it, a Longshot.
Group Boss Hunting
Group Boss Hunting is much more a viable proposition near Secronom Bunker. Flaming Flesh Hounds, Flaming Wraiths, and Flaming Giant Spiders - nearly impossible to kill solo - can be dispatched with help from fellow hunters.
Perhaps more importantly, the more hunters are firing, the less ammo each hunter needs to expend. Hunting in groups of ten or so vastly increases the profit ratio and shortens the time spent. Students can potentially turn a $100,000 profit on ten or fifteen minutes of work instead of looting White Zones for hours.
Grenade Boss Hunting
Near previous outposts, we recommended against uses grenades for boss hunting, because grenades cannot focus firepower on a single target. This is not a problem when hunting multiple targets. In fact, grenades have two important uses in the vicinity of Secronom Bunker:
- They can inflict damage on bosses surrounded by a shield of other zombies.
- They can be used effectively against groups of five mini-bosses.
One problem with the circle-the-block strategy is that it sometimes leaves slower boss zombies behind (Mothers, Flaming Rumblers). Fortunately, zombies tend to closely pursue students who are inflicting damage on them. Grenades can do this even when there is a multitude of zombies in between the student and the target. Firing grenades will keep the boss zombies in pursuit, preventing them from wandering behind walls or other obstacles.
After circling the block long enough to leave the agro behind, students can hopefully find a safe place behind a wall or inside a tennis court, where they can isolate a group of five mini-bosses (usually Flaming Long Arms or Flaming Rumblers - Flaming Flesh Hounds are too fast for this strategy).
At this point, a sustained volley of grenades can wipe out the entire group after several minutes. The advantage is that, because the grenades inflict damage on all five targets equally, the mini-bosses will die nearly simultaneously, in nearly the same spot. This makes collecting loot much easier.
Just remember: Unless a student owns an X-Dusk Launcher or a Boomer PX, it will take over 500 grenades (two and a half boxes of ammo) to kill 5 Flaming Rumblers. That is a lot, but it is much less than the 5,200 rounds (nearly nine boxes) it would take a SCAR 9000 to do the same job.
The Scientific Minimalist Guide to Boss Hunting includes chapters on Flaming Long Armsm Flaming Rumblers, Flaming Flesh Hounds, and Black Titans.
MISSIONS AT SECRONOM BUNKER
There are 20 missions at Secronom Bunker. These run the usual gamut: looting, extraction, exterminating, boss hunting. Some are relatively easy. Others will have students starting a savings account to afford a Wraith Cannon.
Upon first arriving at the outpost, graduate students will find that they can complete looting missions such as Firearm Shortage with ease.
Extermination missions (e.g., To The Slaughter) can be more challenging and should not be attempted unless students have adequate grinding power.
Boss hunting missions (e.g., Wrath of the Wraiths - which requires students to kill 5 Wraiths) are nearly impossible without an expensive Mini-Gun. Speed boosts can help, or students can use a fenced area to trap the Wraiths.
Read more on this subject in our Guide to Secronom Bunker Missions.
SECRONOM BUNKER SUMMARY
Secronom Bunker is more challenging than previous outposts, but that should not intimidate students who have earned a Bachelor's Degree in Scientific Minimalism.
Some tasks may be too difficult, but there are opportunities for looting, grinding, and boss hunting that fall within the skill-set of recent graduates. Students will be able to earn a living while gradually attempting more challenging tasks.
Meanwhile, students should take advantage of occasional weekend events involving speed boosts and/or damage boosts, in order to complete missions and hunt bosses that would otherwise be beyond their grasp.
COMPLETING THE MASTERS PROGRAM
In order to earn a Master's Degree in Scientific Minimalism, students must complete the postgraduate version of one of our recommended builds, which can take anywhere from 95 to 105 levels. Students should also be prepared to move from Secronom Bunker to the Wastelands, which are open only to those who have reached Level 100. In practical terms, this means that students will likely spend at 50 levels or more at Secronom Bunker. This should be enough time to acquire the experience and weapons needed to survive the Wastelands.

Matriculated
1254046