Dead Frontier Survival 390: Precinct 13
COURSE SYLLABUS
A. DESCRIPTION
This course is designed to aid students during their junior semester at Precinct 13, where they will explore the surrounding Orange Zones and begin to make loot runs into more dangerous Red and Black Zones.
B. OBJECTIVES
- Further develop skills to face increasing zombie threats.
- Finalize decision regarding future build development (e.g., Critical or Hybrid)
- Achieve 100-proficiency for looting weapon
- Acquire mid-level grinding weapon
- Prepare for the move to Fort Pastor.
C. TOPICS
This course will cover the following topics:
- Precinct 13 - Overview
- Traveling to Precinct 13
- Stat Allocation
- Second-Guessing Weapons & Builds
- A Few Words in Favor of Precinct 13
- Precinct 13 Zombies
- Precinct 13 Weapons
- Looting near Precinct 13
- Looting Beyond the Orange Zones
- Grinding Tactics in Yellow Zones
- Grinding Beyond the Orange Zones
- Boss Hunting near Precinct 13
- Missions in Precinct 13
- Summary
D. PREREQUISITES
E. REQUIRED READING
- Scientific-Minimalist Guide to Weapons: Rifles
- Scientific-Minimalist Guide to Weapons: Pistols
- Scientific-Minimalist Guide to Missions: Precinct 13
- Scientific-Minimalist Guide to Boss Hunting: Mothers
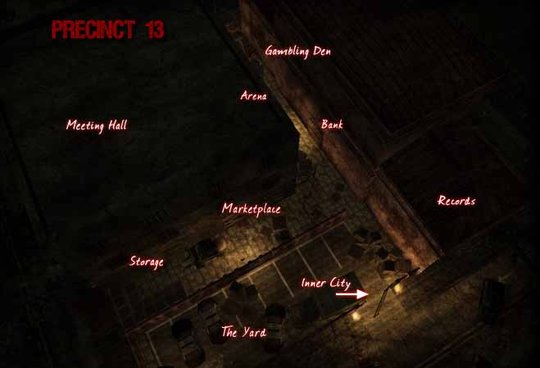
PRECINCT 13 - OVERVIEW
The next outpost is Precinct 13, a police station. Here, students will be within striking distance of the lucrative End Zone, where they can loot more expensive items. There will be new missions with bigger rewards in terms of money and experience.
Juniors will meet new dangers, but they can take advantage of the Precinct’s proximity to familiar, safer territory, where it is possible to loot and grind while leveling up sufficiently to face the challenges of this outpost.
THE JOURNEY
Moving to P13 requires a very long walk south. Most of the path will take students through Green Zones and Yellow Zones, where their current weapons will be more than adequate.
Students may take advantage of a rifle during the trip. An SL8 will one-hit-kill most zombies in the Green and Yellow Zones, and unlike Melee weaponry, a traveling student will not need to stray from his/her path to exterminate zombies en passant.
Only the last two zones on the way to Precinct 13 will be new Orange territory. There will be a few unfamiliar zombies, but students should be able to avoid them and get to their destination safely.
Students may be tempted to engage these zombies, but we advise avoiding the risk of dying and being sent all the way back to Dogg’s Stockade.
WHAT NEXT?
P13 is surrounded by faster, stronger zombies. New equipment will helpful, but fine-tuning stats is essential.
Finish working on Agility if it is not already maxed, then get Critical in place, followed by Reloading. In terms of Weapon Proficiencies, juniors should get their primary weapon up to 100 before advancing to a mid-level secondary weapon.
SECOND GUESSING WEAPONS AND BUILDS
In the Orange Zones and beyond, there will be new challenges that cannot be solved simply by purchasing deadlier weapons and stronger armor. Junior-level students need to develop skills and figure out where their strengths lie.
This process will provide better sense of each student's own preferences and style. Students should ask themselves: "Am I making enough money to afford lots of ammo for Rifles and Machine Guns, or do I need to keep costs down by using Melee? Do I prefer killing everything I see, or would I rather loot quietly, exterminating zombies only when necessary? Do I enjoy grinding with Chainsaws, or does it feel too dangerous?"
During this semester, some juniors begin to grow disenchanted with Melee and Chainsaws, which work well at the freshman and sophomore levels but present difficulties later. Rifles, Pistols, and Machineguns offer a safer if more expensive alternative.
Nevertheless, there are three reasons for sticking with Melee and Chainsaws, at least for the time being:
- Scientific Minimalism prefers the simplest weaponry needed, and Chainsaws still do the job.
- Stats and proficiency still are not in good shape for juniors to switch to Firearms as main weapons.
- Even if a junior had enough stats to reallocate properly, it is too early to contemplate a Stat Change, which costs 200 credits in the Dead Frontier Credit Shop. (As f this writing, 100 credits are currently going for nearly $3-million.)
If students truly dislike Melee and Chainsaws, then by all means they should change. But at this point these weapons still are – and will remain – effective for Defensive Grinding. If a student encounters a sudden aggro spike, Chainsaws will fend off aggressors during a retreat. If students are looting and need to take care of a handful of zombies, they can do so quickly, without generating additional aggro by firing Machine Guns or Shotguns. And if students are economically minded, some of those weak zombies simply are not worth the cost of the bullets it would take to mow them down.
A FEW WORDS IN FAVOR OF PRECINCT 13
Some experienced survivors suggest skipping Precinct 13 in favor of moving to Fort Pastor or Secronom Bunker. Though one could argue that P13 is not absolutely necessary, we recommend stopping there, at least long enough to complete the missions. Our argument is simple: experience and education received at this outpost will benefit junior-level students when they move deeper into Fairview.
Around Fort Pastor (or, worse yet, the Secronom Bunker), juniors could loot and grind if they were careful, but these students are likely to encounter bosses that they cannot handle, and there are missions that would be suicidal to attempt. Juniors should ask themselves whether they want to live in an outpost where their survival depends on avoiding dangers, or would they rather reside where they have a sporting chance of conquering the challenges they face?
Consider this comparative example: Fort Pastor has a mission that requires survivors to exterminate 250 Spiders; when that mission rolled around, a junior would have to sit it out, unless he/she had a death wish. P13, on the other hand, has a mission requiring survivors to exterminate 250 infected cops; on the day of that mission, a junior would be ready to lock-and-load instead of cowering in fear. And the experience gained would put the student in a better position to handle the Spider mission when he/she eventually move on to Fort Pastor.
One other point: P13’s Market tends to be volatile; items can be more expensive than in Fort Pastor, and prices fluctuate. Purchasing food, medication, and ammunition could damage one's wallet, but there is a way to deal with that: don’t wait until necessity forces a purchase; keep an eye on the market, and buy when prices are low.
Also, the higher prices can be to a student's advantage: weapons and armor that sell for scrap value in Fort Pastor may earn a few thousand more dollars in the P13 marketplace.
UPDATE - January 2016: Since the expansion of the Fairview map, Precinct 13 places survivors closer to the entrance of the "Wasteland" area, inhabited by 12-foot-high Devil Hounds. This makes Precinct 13 appealing to long-time survivors who previously eschewed the outpost. We have yet to investigate the Wastelands, so we have no direct evidence or research on how well juniors would fare with their build and weapons at this point, but we suspect that survival rates would be low.
PRECINCT 13 ZOMBIES
The transition to Precinct 13 is odd, in that juniors will encounter no new Common Zombies. The Orange Zones surrounding the outpost are populated by the same Normal Zombies, Burned Zombies, and Irradiated Zombies students battled around Dogg’s Stockade.
However, the Mutant Zombies from the Yellow Zones – Small Bloats, Reapers, and Bones – disappear. In their stead, juniors will face more dangerous counterparts.
The chart below provides specs on these Mutants:
|
Precinct 13 Mutant Zombies |
||||
|
SPECIES |
HEALTH |
DPH |
EXPERIENCE |
ZONES |
|
Bloat |
200 |
40 |
360 |
O, R, B |
|
Tendril |
235 |
70 |
360 |
O, R, B |
|
Spider |
300 |
40 |
405 |
O, R, B |
|
Brute |
400 |
Hit: 30 Vomit: 40 |
505 |
O, R, B |
|
Leaper |
400 |
∞ |
505 |
O, R, B |
The Bloat is a stronger, more dangerous version of the Small Bloat. Ironically, there is a slight advantage to this version: because it is harder to kill, students are less likely to accidentally blow themselves up while attacking it at close range.
The Tendril’s specs may be intimidating, but even they do not tell the full story. Tendrils run and strike fast. If a student's Agility is low and dodging skills are poor, he/she could be in trouble. Even if a student can handle Tendrils one at a time, these zombies can be lethal in groups. Fortunately, they tend not to spawn in overwhelming numbers in Orange Zones
Less damage per hit may make Spiders seem less threatening than Tendrils; however, they are harder to kill, and their speed makes them harder to dodge. They will be a difficult challenge until juniors learn how to outmaneuver them. Remember: they do poorly at making right-angle turns. Move in a zigzag pattern and dodge around objects like cars.
Lethal vomit makes Brutes dangerous, but they are slow and easy to outmaneuver.
Though it does not leap, the Leaper is appropriately named, because it rhymes with “Reaper,” and this is a more dangerous version of a Reaper: a slow, high-risk zombie. Leapers are easy to outrun and dodge, but they kill with a single blow. They pose their biggest risk during aggro spikes, when they sneak up while survivors are distracted by other zombies.
PRECINCT 13 LOOTING WEAPONS
Because juniors will be killing the same Common Zombies that rampaged around Dogg’s Stockade, they could prove stick with old weapons for awhile, especially when looting in nearby Yellow Zones.
However, the new Mutants will take up more of time, slowing down looting efforts. Therefore, the advantage of upgrading is substantial: killing Spiders, Tendrils, and Leapers faster increases the odds of survival.
The chart below shows specs for Looting Weapons that are viable in the Orange Zones around Precinct 13.
|
EFFECTIVE LOOTING WEAPONS FOR PRECINCT 13 |
|||||
|
WEAPON |
Hawk OP96 |
Dragon SVD |
VSS Vintorez |
Alpha Bull |
Battle Axe/ Katana |
|
TYPE |
Rifle |
Rifle |
Rifle |
Pistol |
Melee |
|
PROFICIENCY |
80 |
90 |
100 |
100 |
100 |
|
STRENGTH |
25 |
25 |
25 |
25 |
25 |
|
ACCURACY |
49 |
60 |
60 |
80 |
25 |
|
CRITICAL HIT |
112 |
112 |
112 |
80 |
80 |
|
RELOADING |
124 |
124 |
100 |
124 |
25 |
|
FIRING RATE |
1 |
1.5 |
1.5 |
1.5 |
1 |
|
CLIP SIZE |
7 |
15 |
20 |
5 |
N.A. |
|
DPH |
21/105 |
15/75 |
17/85 |
17.5/87.5 |
17.2/86 |
|
DPS |
21/88.2 |
22.5/94.5 |
25.5/107.1 |
26.24/110.25 |
72.24 |
|
DPC |
147/617.4 |
225/945 |
340/1428 |
87.5/367 |
∞ |
Which is best? That depends on the target. Examine the next chart, showing how many seconds it would take each weapon to kill the zombies around Precinct 13.
|
PRECINCT 13 ZOMBIE KILL CHART Number in Parenthesis represents Damage Per Hit |
||||
|
NUMBER OF SECONDS |
Dragon SVD (75)
|
Battle Axe (86) M1 Garand & MSG-9 (85) |
Alpha Bull (87.5) VSS (85) |
Hawk OP69 & M82A2 (105) Nodachi (107) |
|
0 |
Siren |
Siren Special Male |
Siren Special Male |
Siren Special Male Blood Dog |
|
.66 |
Special Male Blood Dog |
Blood Dog |
|
|
|
1 |
Blood Dog |
Bloat |
||
|
1.33 |
Bloat |
Bloat Tendril |
|
|
|
2 |
Tendril Spider |
Bloat Tendril |
Spider |
Tendril Spider |
|
2.66 |
|
Brute Leaper |
|
|
|
3 |
Spider |
Brute Leaper |
||
|
3.33 | Brute Leaper |
|
||
|
4 |
|
Brute Leaper |
|
|
Notes: For comparison purposes we have included the M1 Garand and MSG-19 rifles (same DPH, different ammo capacity) with the Battle Axe/Katana, which has the same kill-rate. We have also included the Nodachi, a Melee weapon that approximates the results of the HawkOP69 and the M82A2 rifles (same DPH, different ammo capacity).
At a glance, the VSS Vintorez Rifle and the Alpha Bull Revolver have the advantage, but this chart assumes that all weapons are fully optimized, which is not likely to be the case while for students at Precinct 13 during their junior semester. Rifles and Pistols require Critical Hit, Reloading, and in some cases Accuracy.
The Battle Axe/Katana, on the other hand, will be working at maximum efficiency at P13, because it requires an investment only of 31 points in Critical Hit.
If students are wondering about the advantage of upgrading to a Battle Axe/Katana from a Sabre (which we did not list on our chart), they consider that the new weapon will one-hit-kill almost all the Common Zombies in the area, including Burned and Irradiated Males (which necessitated two Critical Hits from a Sabre).
The Battle Axe/Katana also has an advantage over the Sabre when it comes to the number Critical Hits required to kill Tendrils, Brutes, and Leapers:
- Tendril: 4 hits from Sabre; 3 hits from Battle Axe/Katana
- Brute: 6 hits from Sabre; 5 hits from Battle Axe/Katana
- Leaper: 6 hits from Sabre; 5 hits from Battle Axe/Katana
This improvement may seem negligible: what difference does one hit more or less make? Not much when facing a single zombie, but when fighting a herd, the extra hits add up, taking time that could be used searching for loot. A Battle Axe/Katana noticeably speeds up the process.
Also note that the fewer hits are required, the more likely it is that there will be a string of consecutive Critical Hits. Odds are that a Sabre will seldom kill a Brute or a Leaper with 6 blows; seven or eight is more likely. A Battle Axe/Katana may kill a Leaper or a Brute with 5 blows; it will probably do so in 6.
PRECINCT 13 GRINDING WEAPONS
After upgrading to a new Looting Weapon, students spending junior semester in Precinct 13 will have enough proficiency points leftover for a decent secondary weapon. Let's assess the needs and uses of grinding weapons in the vicinity of this outpost.
There are faster zombies nearby, which makes grinding more dangerous in high-aggro situations, such as outpost attacks. However, students will find that they can handle moderate-aggro situations in the Orange Zones. Only in the more dangerous Red and Black Zones will juniors keenly feel the limitations of their current equipment.
A Grinder or a mid-level Machine Gun (a decent SMG or AR) will be adequate to the tasks. High-end equipment will not be needed until later, during senior semester in Fort Pastor.
Why stick with chainsaws at this point? Juniors working on a Melee-Chainsaw build can optimize the Grinder relatively quickly. It takes longer to optimize Machine Gun, which needs points in Reloading and Accuracy - two stats that do not affect Chainsaws.
|
EFFECTIVE GRINDING WEAPONS FOR PRECINCT 13 |
||||||
|
WEAPON |
Gramm M11 |
M16* |
Stell AUG |
Sega-20 |
UMP |
Mannberg |
|
TYPE |
SMG |
AR |
AR |
Shotgun |
SMG |
Shotgun |
|
PROFICIENCY |
40 |
40 |
45 |
45 |
50 |
60 |
|
STRENGTH |
25 |
30 |
30 |
30 |
30 |
50 |
|
ACCURACY |
49 |
49 |
49 |
49 |
49 |
49 |
|
CRITICAL HIT |
124 |
80 |
80 |
N.A. |
124 |
N.A. |
|
RELOADING |
124 |
124 |
124 |
124 |
124 |
124 |
|
FIRING RATE |
8.57 |
8.57 |
8.57 |
2 |
8.57 |
1.5 |
|
CLIP SIZE |
16 |
30 |
42 |
8 |
30 |
12 |
|
DPH |
4.6/23 |
10.6/53 |
10.6/53 |
21.5 |
5.8/29 |
40.5 |
|
DPS |
39/71 |
90/105 |
90/105 |
43 |
50/89 |
60.08 |
|
DPC |
73/132 |
318/369 |
445/517 |
172 |
174/312 |
480 |
This chart skips over low-end Machine Guns and Shotguns, which are virtually worthless. Of the mid-level weapons on the chart, none is overwhelming in terms of DPS. However, all of them are useful to some degree around P13, especially as defensive weapons that can hold a swarm at bay during a retreat.
In fact, the Sega-20 Shotgun, which looks flimsy in terms of DPS, delivers impressive knockback, because it fires twice per second, and each shot consists of 10 pellets – more than twice the projectiles fired by Submachine Guns and Assault Rifles. The Sega will not kill zombies very fast, but it will keep them at a distance – at least until it reloads (which is, unfortunately, rather frequently, because of the small clip size).
None of these weapons has ammo capacity so big that students can short-change points in Reloading. Juniors with builds low in this stat should note that the two weapons with the most Damage Per Clip are the Stell Aug and the Mannberg.
Also note that the M16 and the Stell Aug give the best DPS of any weapons in this group. In fact, their DPS is identical to that of the 70-proficiency XM8: the only difference between the three weapons is ammunition capacity.
Conclusion: Coming in at the top in terms of DPH, DPS, and DPC, the Stell Aug Assault Rifle is the best option at this level. Its requirements are modest: 45 in Machine Gun Proficiency, 80 in Critical Chance, and 30 in Strength (the same as most SMGs).
LOOTING IN PRECINCT 13
Looting around Precinct 13 will be harder – but not impossible. Mutant Zombies will take longer to kill, impeding progress, but a combination of a Battle Axe/Katana, a Grinder, and an SL8 form an unbeatable looting combination in the Orange Zones.
Use Melee to quietly destroy zombies near loot spots. A Battle Axe/Katana will one-hit-kill most of the Common Zombies.
Use Rifle or Pistols to pop Bloats from a safe distance. The SL8 will one-hit-kill the Normal Zombies that still appear in these areas; it can reliably finish off Mutants with a single clip, so Reloading is less of an issue.
If there are too many dangerous zombies (especially Spiders and Tendrils), switch to Chainsaw and clear the screen. A Grinder will eliminate half dozen zombies in a few seconds – which is probably the most that will appear near Precinct 13, where zombie population density is relatively low.
In fact, the density is so low that students can use the Grinder as a Looting Weapon: instead of the stealth approach, kill everything in the immediate area; then loot afterward.
The advantage of using a Grinder to loot is that, unlike Machine Guns and Shotguns, Chainsaws do not provoke aggro spikes. They will attract zombies within hearing range, but even this is advantageious: targets will approach, practically walking into the chainsaw.
A Grinder will probably handle genuine aggro spikes in Orange Zones – or at least fend off the swarm, providing an opportunity to escape to another area. Seldom if ever will aggro become so overwhelming that stuents need to switch to a Machine Gun.
LOOTING BEYOND THE ORANGE ZONES
As students travel farther east, seeking better loot, they will encounter not only more dangerous zombies but also great population density. This will make looting more difficult, as it will be harder to avoid being noticed by zombies and harder to kill them when they do notice.
Melee weapons will help, allowing students to silently kill zombies hovering around loot spots, but the main trick is to avoid killing anything unnecessarily. In essence, students will adopt a guerilla approach to looting: get in and get out while causing as little commotion as possible.
Grab the low-hanging fruit. Most areas have loot spots near the intersections where survivros enter the area; it is often relatively easy to loot a corpse near the northwest entrance before the zombies approach. Cars are also good loot spots, blocking the zombies from attacking.
If looting on the street is too difficult, try going inside buildings. This can be dangerous – it is easier to get trapped in a dead end – but the walls act as protective barriers, making it easier to outmaneuver and kill zombies, grabbing loot before others show up.
GRINDING TACTICS IN YELLOW ZONES
Grinders should handle most low-level aggro. Population density is reasonably low in Orange Zones, and though there are dangerous Sirens and Spiders, they usually do not show up in numbers sufficient to become a major threat. Use Machine Guns during moments when the aggro grows overwhelming.
The trick is to keep circling. Zombies strike directly in front of themselves; by continuously circling, a chainsaw student can fool zombies, who will strike where the student was rather than where the student is. Circling also tends to bunch zombies together in groups; this slows down the faster zombies, which get blocked by their slower comrades.
As always, split large crowds by sprinting in between some obstacles or behind a wall or a fence. Kill off the zombies in small groups as they catch up.
Fortunately, not every aggro spike will force students to resort to drastic measures. Let’s take a look at the different ways students may encounter aggro.
AGGRO SPIKE WHILE LOOTING
These spontaneous outbursts are usually mild-to-moderate in Orange Zones. I grind my way through them with the Chainsaw, switching to Rifle to pop Bloats on the verge of exploding (they turn bloody after a few swipes with a chainsaw).
Spiders and Tendrils may show up, but usually only a few at a time. Kill them, and the aggro will go back to being relatively safe for a while.
If the aggro grows truly dangerous (i.e., I have been wounded), I go to Inventory, take some medication, and swap my machine gun in for one of my looting weapons; then finish off the aggro, returning to the Grinder only if it seems safe.
PROVOKING AGGRO
Survivors do this when they want to grind as many zombies as possible, to level up. If students do this, they will probably use a machine gun, both to provoke and to kill the aggro, though they could save ammunition by sweeping up the last remnants with a Chainsaw.
Chainsaws will not ignite a huge outburst; Machineguns, Shotguns, and Grenade Launchers will.
EXTERMINATION MISSIONS
These tend to have much more threatening aggro, but they can be completed with a Grinder, used with correct strategies.
We discuss Precinct 13 Missions in general below. Students can find specific tactics in the P13 section of the Scientific-Minimalist Guide to Missions.
OUTPOST ATTACKS
Aggro during Precinct 13 outpost attacks can swell to dangerous levels, with multiple Spiders, Tendrils, and Hounds. This can make it difficult to survive with just a Grinder, but there are few strategies that will help.
First: Stay near the outpost, where the guards will shoot at anything within range. Their bullets will help kill the zombies.
Second: Duck back inside the outpost if things get too scary. Step back into the street, and the aggro will reset to safe levels.
Third: Use fences and walls to divide and conquer: section off a portion of the zombie horde and kill them before the rest get around the obstruction.
GRINDING BEYOND THE ORANGE ZONES
Grinding in the more dangerous Red and Black Zones is not recommended at this time. Not only are the zombies harder to kill; there is also a higher proliferation of fast zombies (Spiders, Tendrils, Flesh Hounds). As students have probably noticed, when there are several zombies in a row, they push each other forward, mitigating the knockback of grinding weapons. This can be a real problem for junior-level students who go beyond the Orange Zones.
Which is not to say it is impossible; skill counts for much in Dead Frontier, not just weapons and armor. Nevertheless, it is a good idea to have a powerful Machine Gun (or Shotgun) to fend off aggro while grinding in Red and Black Zones.
BOSS HUNTING IN PRECINCT 13
Students may confront new and more dangerous Bosses: Wraiths and Spiders, both of which appear in “normal” and “burning” versions. Juniors should not worry unduly; though Wraiths and Spiders can spawn in Orange Zones, our research indicates that they seldom if ever appear within walking distance of Precinct 13.
Students will continue to encounter Burning Zombies, Titans, and Mothers near Precinct 13. However, having defeated them is no guarantee of defeating them now. In the Orange Zones, aggro becomes a bigger factor in Boss Hunting. The ability to concentrate fire upon a target is compromised by the increased number and strength of other zombies in the area, which swarm around the Boss, providing a protective shield.
Consequently, single-fire weapons are less useful in Orange Zones: unless a student can isolate the boss in a parking lot or a playing field, it will be difficult if not impossible to snipe it with a rifle or a pistol. Students will need to go full-tilt boogie with the heaviest grinding weapon they have, hopefully a machine gun with good DPS.
Read the Scientific-Minimalist Guide to Boss Hunting for strategies.
MISSIONS IN PRECINCT 13
There are eighteen missions offered in Precinct 13, some of which can be quite challenging for junior-level students.
There is the usual mix of mission types: Extermination, Looting, Search-and-Rescue. The latter two types, which tended to be easy in previous outposts, are complicated here by moderate-to-heavy aggro.
Unfortunately, this tends to make the missions boring rather than challenging. The successful strategy consists of endlessly luring zombies away from a loot spot or a character, then returning to grab the loot or talk to the character.
Some looting missions are still easy – the ones which designate a particular type of loot spot (e.g., flatbed trucks with supplies).
For Melee-Chainsaw students, the extermination mission will test the limits of their ability to dodge hordes of fast-movie zombies.
If students are using some combination of firearms (such as Rifles and Submachine Guns or Pistols and Shotguns), they may run into Reloading difficulties because of the limited ammo capacity of low- or mid-level weapons.
Low Damage Per Second is also an issue, especially for juniors grinding with Shotguns.
Ironically, by the time students are ready to leave Precinct 13, their build will be approaching the point where they could more easily finish all the missions. As frustrating as it may be to depart, students can console themselves knowing that they will return to the outpost someday, to explore the nearby Wastelands.
Check out the Precinct 13 section of the Scientific-Minimalist Guide to Missions for more mission-specific suggestions.
PRECINCT 13 SUMMARY
By the time students leave Precinct 13, they should be at Level 30, with a high-end primary weapon for looting and a mid-level secondary weapon for grinding. Agility should be maxed. Critical Chance and/or Strength should be optimized for current weapons. And investment in Reloading should have begun (for those builds that use Reloading).
MOVING ON
It is now time to transfer to Fort Pastor, where students will complete their under-graduate studies by taking the program's final course: Survival 490: Fort Pastor.
Matriculated
1253277