
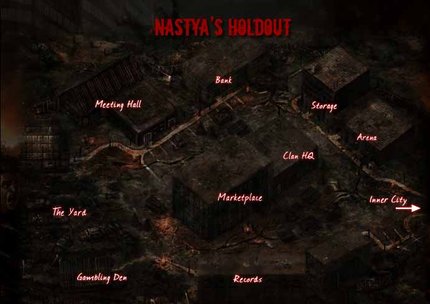
Dead Frontier Survival 190: Nastya's Holdout
COURSE SYLLABUS
A. DESCRIPTION
This course is designed to aid freshmen students embarking into Fairview for the first time. Information will be provided regarding the challenges associated with Nastya's Holdout (the first outpost on the map) and the surrounding Blue and Green Zones.
B. OBJECTIVES
- Apply the lessons of Dead Frontier 101 to real-world situations in Fairview.
- Gain experience in basic tasks (looting, grinding, etc).
- Develop skills to survive near Nastya's Holdout.
- Prepare for the eventual move to Dogg's Stockade.
C. TOPICS
This course will cover the following topics:
- Nastya's Holdout - Overview
- Zombies Near Nastya's Holdout
- Effective Weapons for local threats
- Looting Near Nastya's Holdout
- Grinding Near Nastya's Holdout
- Boss Fighting Near Nastya's Holdout
- Missions at Nastya's Holdout
D. PREREQUISITES
- Dead Frontier 101 (or equivalent)
- Scientific-Minimalist Guide to Builds
- Scientific-Minimalist Guide to Missions: Introduction
- Scientific-Minimalist Guide to Boss Hunting: Introduction
3. REQUIRED READING
- Scientific-Minimalist Guide to Weapons: Melee
- Scientific-Minimalist Guide to Weapons: Chainsaws
- Scientific-Minimalist Guide to Missions: Nastya's Holdout
- Scientific Minimalist Guide to Boss-Hunting: Burning Zombies
NASTYA'S HOLDOUT - OVERVIEW
Nastya’s Holdout is the starting point for everyone in Dead Frontier – the first outpost, from which survivors emerge after choosing a profession and heading into the city of Fairview. Initially, the experience can be overwhelming to inexperienced freshmen. Fortunately, a little education, along with practice in the field, will prove that the Blue Zones around Nastya's Holdout are very safe compared to the rest of the city.
COMMON ZOMBIES IN THE BLUE ZONES
- Dog Zombie: 20 Health Points
- Female: 21 Health Points
- Male: 25 Health Points
- Fat Female: 30 Health Points
- Fat Male: 34 Health Point
The important thing for to know is that there are five “Normal Zombies” in the nearby Blue Zones, all listed above. The strongest of these is the Fat Male Zombie, who has 34 Health points. This means that, in order to kill the Fat Male with a single blow or shot, students need a weapon that inflicts at least 34 damage points.
Except during Outpost Attacks, zombies are spread thin around Nastya’s Holdout, and they move slowly, so they represent a minimal threat. Keep this in mind while making Build and Weapon choices.
More details are available in our Zone by Zone Zombie Guide and in our Weapon Effectiveness Guide.
EFFECTIVE WEAPONS FOR NASTYA’S HOLDOUT
Freshmen students should being with a Looting Weapon; a grinding weapon will come later. Choices for Looting Weapons are: Melee, Pistols, and Rifles. The only easily accessible grinding weapon at this level is a Chainsaw.
What are the advantages of each?
MELEE
 Melee is the best weapon for beginning students, because it requires neither Accuracy nor Reloading – only Critical Hit. Because it requires no ammunition, melee is cheap and convenient; not only will it save money; it will also save inventory space, which will be left available to hold looted items.
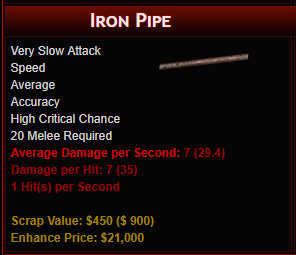
Recommended weapons for builds at this level are the Iron Pipe (proficiency: 20) and the Kris (proficiency: 50). Both will one-hit-kill all zombies around Nastya's Holdout, but the Kris is preferable, because it requires less points in Critical Hit, and it strikes faster than the Iron Pipe.
CHAINSAWS
 Melee has one other huge advantage for first-semester students: unlike any other weapon proficiency, raising Melee proficiency allows students to equip two different kinds of weapons, Melee and Chainsaws – the first for looting, the second for grinding.
Chainsaws are harder to optimize than simple Melee. They require 112 in Critical Hit, plus Strength – up to 50 points for the biggest. In exchange, students receive unlimited free-grinding – no cost for ammo and no concerns about Reloading or Accuracy.
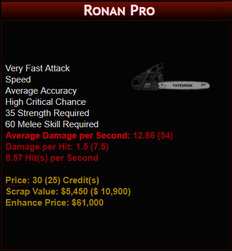
The recommended Chainsaw for this level is the Ronan Pro (proficiency 60).
RIFLES
 After Melee, Rifles are the best choice for freshmen students, because the low-end weapons are reasonably effective. Even Beta RX4 (weapon proficiency: 10) can one-hit-kill the zombies around Nastya’s Holdout. However, low-end rifles require 112 in Critical Hit, and on top of that they need Reloading and, possibly, Accuracy (often achieved with only MC stats). This means it takes longer to optimize Rifles than Melee
The recommended weapon for this outpost is the SL8 (proficiency: 20) because of its large ammo capacity (30 rounds) – which off-sets the disadvantage in Reloading. This rifle can one-hit-kill anything in the area.
PISTOLS
 Pistols lag behind Rifles in effectiveness. Pistols are also more stat-hungry than rifles: in addition to Reloading and Critical Hit, they require more Accuracy than can be achieved with only MC stats.
If students opt for Pistols, they have two options:
- Automatics (faster firing rate, less Damage Per Hit)
- Revolvers (slower firing rate, more Damage Per Hit)
Revolvers need 80 points in Critical Hit; Automatics need 112. Both types require 80 points to achieve “reliable” Accuracy (more for “perfect” Accuracy). Automatics have larger clips sizes, so Reloading is slightly less of an issue.
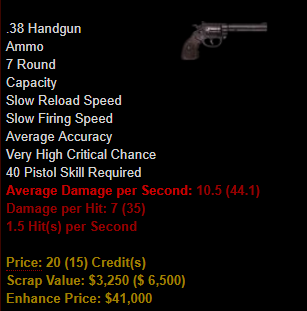
The recommended weapon for this level is the Webster 1942 Revolver – the first handgun capable of one-hit-killing every zombie in the area.
The chart below shows key information for the weapons that are most useful in the Blue Zones. Weapons are listed from left to right in approximate order of how easy it is to equip them – first in terms of proficiency, then in terms of stats. Keep these details in mind while referring to our recommendations.
|
Effective Weapons for Blue Zones |
|||||
|
WEAPON |
Iron Pipe |
SL8 |
Webster 1942 |
Kris |
Shovel |
|
TYPE |
Melee |
Rifle |
Pistol |
Melee |
Melee |
|
PROFICIENCY |
20 |
20 |
40 |
50 |
50 |
|
STRENGTH |
25 |
25 |
25 |
25 |
25 |
|
ACCURACY |
N.A. |
49 |
80 |
N.A. |
N.A. |
|
CRITICAL HIT |
112 |
112 |
80 |
80 |
80 |
|
RELOADING |
N.A. |
100 |
124 |
N.A. |
N.A. |
|
FIRING RATE |
1 |
1 |
1.5 |
1.5 |
1 |
|
CLIP SIZE |
N.A. |
30 |
7 |
N.A. |
N.A. |
|
DPH |
7/35 |
10/50 |
7/35 |
7/35 |
10.6/53 |
|
DPS |
7/29.4 |
10/42 |
10.5/44.1 |
10.5/44.1 |
10.6/44.5 |
|
DPC |
∞ |
300/1260 |
49/205.8 |
∞ |
∞ |
Note: DPH (“Damage Per Hit”) gives the figure for non-critical hits and critical hits: "7/35" means that a non-critical does 7 damage points, while a critical hit does 35 points damage. DPS (“Damage Per Second”) averages out the damage given by critical hits and non-critical hits. DPC (“Damage Per Clip”) shows the total damage a weapon will inflict before reloading: "300/1260" means that the weapon will inflict 300 damage points with no stats in critical and 1260 damage points with the critical stat at maximum.
All of these weapons will one-hit-kill any Normal Zombie in the Blue Zones around Nastya's Holdout. Because they are Very High Critical Chance Weapons, the Webster, the Kris, and the Shovel are more likely to deliver a lethal blow than the Iron Pipe or the SL8. Because of their faster firing speed, the Webster 1942 and the Kriss will kill zombies faster than the other weapons.
For more information, including comparisons to other weapons, refer to The Scientific-Minimalist Guide to Weapons and/or the Weapon Effectiveness Charts.
LOOTING AT NASTYA’S
Now, we will look at how these weapons work in the area around Nastya's Holdout, beginning with Looting.
When looting, students will search for objects (cars, bodies, mailboxes, etc) identified with a Question Mark, hoping to pick up items to use or sell (ammo, food, medicine, weapons, armor, money). Recommended priority is not killing zombies; it is finding as many Loot Spots as possible with minimal fuss. To do this, use a Quiet Looting Weapon.
The Iron Pipe is really all that is needed to achieve this goal. A critical hit from this weapon does 35 points of damage – enough to kill a Fat Male Zombie with a single blow. If a zombie is lurking around a loot spot, students can hit it once and take the loot, without arousing the attention of any other zombies on screen.
The Iron Pipe requires 20 proficiency, so students can equip one almost immediately, especially if their character is a Boxer or a Fireman, each of which start with 15 points in Melee skill.
The Iron Pipe is a “High Critical Hit” weapon, which means that it requires a total of 112 points in Critical Hit (ideally 88 base stats and 24 Mastercrafted stats). However, based on past experience, the weapon is effective enough with only 80 in Critical Hit. Try to move quietly through the area, striking only when necessary. The Iron Pipe has a long enough reach to allow students to stand at a reasonably safe distance and strike again if the first blow is not fatal.
The Iron Pipe has no other stat requirements: no Strength, no Accuracy, no Reloading.
Also note that the Iron Pipe has Very Slow Attack Speed, which means that it strikes once per second. Generally, this attack speed is shared by Melee weapons that are swords, axes, or sledgehammers.
Other Melee weapons, such as Knives and Scalpels strike 1.5 times per second, but they do less damage per hit (compared to other Melee weapons of similar proficiency), and their range is shorter. Take this into consideration when trading up for the next available Melee weapon.
One of the temptations when leveling up is to immediately purchase a new weapon each time proficiency is raised high enough. This can be a mistake for the reason mentioned above. After the Iron Pipe, the next Melee weapon is the Nail Bat (proficiency 25), which does less damage per hit – requiring two critical hits to kill, instead of only one. Stick with the Iron Pipe.
The next attractive Melee Weapons are the Crowbar and the Shovel: the first delivers 41 damage points per critical hit; the latter delivers 53 points of damage per critical hit. Those additional points are not going to kill Blue Zone zombies any deader than the Iron Pipe, so they will do little to improve looting capability around Nastya’s Holdout (though they may help after moving on to “greener” pastures).
As mentioned above, the Shovel does have an advantage: it is a “Very High Critical Chance” weapon, which can be optimized with 80 points in Critical Hit. That may make it a worthwhile purchase, but we suggest skipping it and move on to the Kris, which will be discussed in the next section.
GRINDING AT NASTYA’S HOLDOUT
Grinding is the process whereby students earn experience points by killing as many zombies as possible. To some extent students are always “grinding” when killing zombies as they search for loot, but generally there term is reserved for taking on swarms of the undead, either during an Outpost Attack, an Aggro Spike, or an Extermination Mission.
Whatever the case, an Iron Pipe – striking once per second – is not going to serve very well against multiple zombies. One possible strategy is to stand on one side of a fence that corals the zeds like sitting targets. Unfortunately, though Iron Pipe’s reach is long enough to take out most of the zombies from a safe distance through a fence, the dogs will be able to counterattack.
Therefore, students will need a faster weapon. That’s where the Kris comes in, and later the Ronan Pro.
The Kris is a Very High Critical Chance weapon with Slow Attack Speed. It strikes 1.5 times per second and lands a critical hit four out of five times with the Critical stat at 80. A critical hit inflicts 35 points of damage – exactly the same as the Iron Pipe, but at a faster rate.
The Kris has a shorter range than the Iron Pipe, but the faster striking speed insures that, if the first blow is not fatal, the second, lethal blow will probably land before the zombie counterattacks.
Mathematically minded minded should note that, although the Iron Pipe and Kris deliver the same damage per hit, the Kris delivers more damage per second (52.5) because of its faster attack speed. Consequently, the Kris can take out small groups of zombies much more quickly than the Iron Pipe (or the Crowbar or the Shovel). If students are moving around an open area with lots of room to dodge, they can probably kill zombies safely and effectively, though not quite as fast as they would like.
To up the carnage, consider acquiring a Ronan Pro Chainsaw. This is the second chainsaw (after the Dilmar PS, which is so weak that we recommend our students simply skip it). The Ronan Pro requires 60 proficiency in Melee; stat requirements are 35 in Strength and 112 in Critical Hit.
The Ronan Pro inflicts 63 damage points per second (assuming stats are optimized). With no need to reload, and no pause between hits, the Ronan Pro (like all chainsaws) delivers continuous damage at a Very Fast Attack Speed, which will stun and knock back the zombies, protecting students while they grind.
The Damage Per Second of the Ronan Pro may not sound like a huge increase over that of the Kris (41.4), but the numbers are misleading. The Kris delivers 35 points of damage for every critical hit, which means that much of its damage is wasted. For example, a Female Zombie has only 21 health points, but it still takes a critical hit (35 damage points) from the Kris to kill it. The extra 14 damage points go unused. Striking 1.5 times per second, the Kris, at best, could kill 3 zombies every two seconds.
The Ronan Pro, on the other hand, “strikes” 8.57 times per second, each critical hit delivering 7.35 damage points. Three critical hits (totaling over 21 damage points) could kill a Female Zombie in just over a third of a second, with little or no wasted damage. With luck, students could kill four or five zombies every two seconds.
I have done Outpost Attacks at Nastya’s, using a Ronan Pro with only 80 Critical Hit stats. Though not optimized, the chainsaw still outperformed the Kris when it came to swarms of zombies. There is less risk of being struck, and if the zombies were back behind a fence, it was easy to walk back and forth in front of them, dragging the chainsaw at a perpendicular angle while they flailed, unable to counterattack – it was like shooting fish in a barrel.
Bottom line: with a Kris and a Ronan Pro, and halfway decent stats, students are just about unbeatable in an Outpost Attack. We won’t say completely invulnerable – they will get hit from time to time – but with only a moderate amount of skill students will be able to grind all they want.
BOSS FIGHTING AT NASTYA’S HOLDOUT
- Flaming Zombie: 2,500 Health Points
 So much for defeating the Normal Zombies. What about the more dangerous varieties?
There is only one “Boss” around Nastya’s – actually a “Mini-Boss,” called the Flaming Zombie. This enemy is faster than the other zombies in the area and delivers three or four times as much damage when it strikes. More important, it has 2,500 Health Points, which means a one-hit-kill is out of the question. (Fortunately, students receive 2,700 Experience Points for killing a Flaming Zombie, so the task is worthwhile.)
Any of the Effective Weapons mentioned in this section will do the job, but with more DPS, the job will be quicker. Melee works well, though it necessitates proximity to the target, which creates a window of vulnerability. Studnets can kill a Burning Zombie in two minutes with an Iron Pipe - faster with a Crowbar, a Shovel, a Kris, a Trench Knife, a Wood Axe/Machete, or a Ronan Pro.
Nervous students may prefer firearms, which give range; however, these weapons tend to be at a disadvantage at the freshmen level because of problems with Reloading and Accuracy. Also, they may attract other zombies that will interfere with the combat.
Students can learn specific techniques for handling this zombie in the Flaming Zombie section of our Bare Minimum Guide to Boss Fighting.
MISSIONS AT NASTYA’S HOLDOUT
There are twelve missions at Nastya’s Holdout. Most of them are simple looting missions, which can be accomplished with only an Iron Pipe. The difficulty, if it exists at all, lies in finding the designated objects (a doll, medical supplies, etc).
Additionally, there are a few missions that involve some level of Aggro and/or Grinding, and one mission in which students must kill a Flaming Zombie; these missions benefit from the use of a Kris and/or a Ronan Pro.
Think of these missions as wading into the shallow end of the pool to get your feet wet before plunging into deeper water. What you learn from these missions will benefit help you to complete more difficult missions at later outposts.
Check out our section on Missions at Nastya’s Outpost for more specific advice.
NASTYA’S OUTPOST SUMMARY
Aspiring students can do everything they need to do around Nastya’s Holdout with an Iron Pipe and/or a Kris, plus a Ronan Pro. Other weapon options are available, some of which may prove useful in the long term, but for the time being, the ease of equipping Melee weapons makes them very attractive at this stage of the game.
These weapons are adequate to succeed in the Blue Zones. Students could purchase more expensive weapons, but any improvement in performance would be mostly negligible.
For example, with Melee Proficiency at 60, students could upgrade from a Kris to a Trench Knife, which also strikes 1.5 times per second but which does 41 damage points per critical hit instead of only 35. However, those extra 6 damage points will not kill the Normal Zombies in the Blue Zones any faster; both weapons will kill these zombies with a single critical hit at a rate of 1.5 per second. The Trench Knife would kill a Flaming Zombie in less time, but that is the only instance in which its superiority to the Kris would be apparent. Therefore, students should consider whether it is worth the price at Nastya’s Holdout, rather than waiting until they get to their next stop, Dog’s Stockade.
Continue to next semester: Dead Frontier Survival 290: Dogg's Stockade

Matriculated
1253961