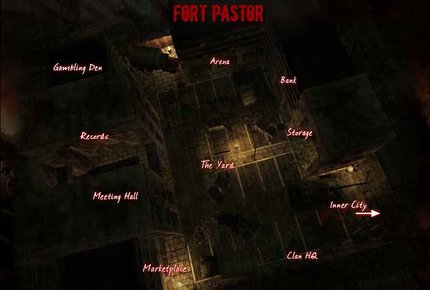
Dead Frontier Survival 490: Fort Pastor
COURSE SYLLABUS
A. DESCRIPTION
This course is designed to aid senior students at Fort Pastor, where they will explore the surrounding Orange Zones and begin to make loot runs into more dangerous Red and Black Zones.
B. OBJECTIVES
- Develop skills to face threats in Red and Black Zones.
- Complete build up to Level 50.
- Acquire second 100-proficiency weapon.
- Begin work on third weapon choice.
- Complete undergraduate work in preparation for move to Secronom Bunker or Wastelands.
C. TOPICS
This course will cover the following topics:
- Fort Pastor - Overview
- Traveling to Fort Pastor
- What Next: Planning Stat Allocation to "complete" build
- A Few Words about Fort Pastor
- Fort Pastor Zombies
- Red Zone Looting Weapon Analysis
- Looting around Fort Pastor
- Senior-Level Grinding Weapons
- Grinding around Fort Pastor
- Boss Hunting Near Fort Pastor
- Missions at Fort Pastor
- Fort Pastor Summary
- Graduation
D. PREREQUISITES
- Survival 390: Precinct 13
- Scientific-Minimalist Guide to Builds
- Scientific-Minimalist Guide to Boss Hunting: Burning Zombies
- Scientific-Minimalist Guide to Boss Hunting: Titans
- Scientific-Minimalist Guide to Boss Hunting: Mothers
E. REQUIRED READING
- Scientific-Minimalist Guide to Weapons: Grenade Launchers
- Scientific-Minimalist Guide to Missions: Fort Pastor
- Scientific-Minimalist Guide to Boss Hunting: Wraiths
- Scientific-Minimalist Guide to Boss Hunting: Giant Spiders
- Scientific-Minimalist Guide to Boss Hunting: Black Titans
FORT PASTOR - OVERVIEW
The transition to Fort Pastor is one of the easiest that students will face in Dead Frontier. Fairview’s fourth outpost is, like Precinct 13, located in the Orange Zones, so the threat level is approximately equal. The odds of meeting a Wraith or a Giant Spider are higher, and one mission involves a Black Titan; other than that, seniors will encounter familiar zombies around the Fort.
These are three main differences between Fort Pastor and Precinct 13:
- Fort Pastor is slightly closer to the Southeast End Zone and much closer to the Northeast End Zone. These areas are inhabited by more dangerous Common Zombies and a higher percentage of Mutants
- Fort Pastor is one block farther away from the safer Yellow Zones, where senior students can still loot and grind safely if they do not feel up to the dangers of the Orange Zones.
- There is a greater variety of challenging missions, with higher payout in terms of money and experience.
- There is a lower demand – and hence lower prices in the marketplace – for low-level medication, food, and equipment.
If students have diligently studied the course material so far, they should be fully prepared to loot and grind around FP. Seniors can even risk forays into the Red Zones, but they may want to exercise caution regarding the Black Zones until they have leveled up a few more times.
THE JOURNEY
The trip to Fort Pastor requires another long walk, though not quite as long as the one from Dogg’s Stockade to Precinct 13. Unless students deliberately choose a roundabout path, their entire journey will be through Orange Zones, so they will not meet any new threats on the way. With a Level 30 Build (or thereabouts), the danger should be minimal, unless students happen to run into an unfamiliar Boss Zombie.
WHAT NEXT?
Fort Pastor is where seniors “complete” the undergraduate version of their builds. Of course, a build is never truly completed (at least not until Level 220), but by Level 50, seniors should have their essential stat and proficiency points in place, with equipment sufficient to face Dead Frontier’s major challenges. After this, students will be concerned less with necessities than luxuries (“Can I afford that limited edition weapon with the massive DPS that I will most likely almost never need?”)
Seniors will raise their Secondary Weapon Proficiency to Elite Level and then decide whether to go back and max out Primary Weapon or work on a third weapon.
Seniors will raise their Reloading stat until they feel comfortable. Students with Submachine Guns will max out Critical Chance. Students with Assault Rifles or Shotguns will raise Strength. If there are any leftover points, they will go into Accuracy if needed. Melee-Chainsaw students may prefer to start working on Endurance, since being wounded by zombies is an occupational hazard for them.
A FEW WORDS ABOUT FORT PASTOR
Fort Pastor used to mark the final frontier – the last outpost before the End Zone, popularly known as “Death Row” (for reasons students can guess). As such, it was where the upper level survivors congregated, so there was a thriving market, filled with goods looted from the End Zone.
Since the expansion of Fairview to include the Secronom Bunker and the Wastelands, Fort Pastor is not as significant as it once was. At this point, FP’s main selling point is that it puts students within striking distance of both the North and South End Zones without placing them so deep in the city that they risk instant death ever time they venture from the outpost.
FORT PASTOR ZOMBIES
As previously mentioned, there are no new Common Zombies or Mutants around the Fort. However, seniors will probably be using the outpost as a launching pad for excursions into the Red Zones, where they will meet some more challenging adversaries.
|
Red Zone Common Zombies |
||||
|
SPECIES |
HEALTH |
DPH |
EXPERIENCE |
ZONES |
|
Red Long Arm |
140 |
36 |
230 |
R, B |
|
Red Rumbler |
170 |
40 |
250 |
R, B |
Technically, these new foes are Special Zombies; however, their prevalence demands that they be treated as Common Zombies.
Essentially, the Long Arm functions like a stronger version of the Normal Male Zombie, and the Rumbler is the equivalent of a Fat Male on steroids.
Though the Health Points of these zombies are lower than those of Mutants (Elite Level equipment is not necessary in order to kill them in a second or less), students will find that looting takes much longer if they do not upgrade to weapons that can kill these creatures quickly.
RED ZONE LOOTING WEAPON ANALYSIS
Now, let's explore the effectiveness of Looting Weapons in Red Zones. We will begin by revisiting the Zombie Kill Chart we used in Precinct 13, this time with new threats added.
|
Fort Pastor Zombie Kill Chart – Elite Weapons With Red Zone Zombies Added |
||||
|
NUMBER OF SECONDS |
Dragon SVD (75)
|
Battle Axe (86) M1 Garand & MSG-9 (85) |
Alpha Bull (87.5) VSS (85) |
Hawk OP69 & M82A2 (105) Nodachi (107) |
|
0 |
Siren
|
Siren Special Male |
Siren Special Male |
Siren Special Male Blood Dog |
|
.66 |
Special Male Blood Dog Long Arm |
Blood Dog Long Arm Rumbler |
|
|
|
1 |
Blood Dog Long Arm Rumbler |
Long Arm Rumbler Flesh Hound Bloat |
||
|
1.33 |
Bloat Rumbler Flesh Hound |
Bloat Flesh Hound Tendril |
|
|
|
2 |
Tendril Spider |
Bloat Flesh Hound Tendril |
Spider |
Tendril Spider |
|
2.66 |
Brute/Leaper |
|
||
|
3 |
Spider |
Brute/Leaper |
||
|
3.33 |
Brute/Leaper |
|
||
|
4 |
Brute/Leaper |
|
||
As the chart shows, the performance of these Elite Weapons is not bad – all of them can kill the new zombies in two seconds or less. Unfortunately, these numbers are not quite as impressive as they used to be.
In the Red Zones, the zombie population is so dense that delays can be more costly. In the Orange Zones, students could take four seconds to kill a Brute or a Leaper and still have time to loot before some straggler arrived to interfere. In the Red Zones, the window of opportunity is much shorter: while a student is spending four seconds killing one zombie, another zombie is approaching; by the time the new zombie is dead, yet another one is on the way – and then another, and another. Therefore, students need to finish off the zombies more quickly than they did in the easier zones.
Let’s look at some weapon that will achieve this goal. In order to narrow the weapon choices at Fort Pastor, we will cap proficiency at 110 – with one exception. For the most part we do not think 120-proficiency weapons are necessary in the Red Zones, and students still working on their builds could better use the extra ten points on a second or third weapon.
Below are the specs on potential looting weapons for use around Fort Pastor.
|
FORT PASTOR LOOTING WEAPON SPECS |
|||||
|
WEAPON |
Wakizashi |
Nodachi |
475 Magnum |
577 Rex |
Ironsight |
|
TYPE |
Melee |
Melee |
Pistol |
Rifle |
Rifle |
|
PROFICIENCY |
105 |
110 |
110 |
110 |
120 |
|
STRENGTH |
25 |
25 |
25 |
25 |
25 |
|
ACCURACY |
N.A. |
N.A. |
80 |
49 |
49 |
|
CRITICAL HIT |
80 |
80 |
112 |
80 |
80 |
|
RELOADING |
N.A. |
N.A. |
124 |
110 |
100 |
|
FIRING RATE |
1.5 |
1 |
2 |
1 |
1 |
|
CLIP SIZE |
N.A. |
N.A. |
16 |
20 |
25 |
|
DPH |
13.6/68 |
21.4/107 |
15.85/79.25 |
29/145 |
35/175 |
|
DPS |
20.4/85.68 |
21.4/89 |
31.7/133.14 |
29/122 |
35/147 |
|
DPC |
∞ |
∞ |
253/1065 |
580/2440 |
875/3675 |
Now let’s see how these new weapons stack up against Red Zone Zombies. Note that the Nodachi is not listed in this chart – it was included in the previous chart because its performance duplicates that of the HAWK Op96 rifle.
|
Fort Pastor Zombie Kill Chart – Epic Weapons |
||||
|
SEC. |
Wakizashi (68) |
475 Magnum (79.25) |
Rex 577 (145) |
Ironsight (175) |
|
0 |
|
Siren |
Siren Special Male Blood Dog Long Arm |
Siren Special Male Blood Dog Long Arm Rumbler |
|
.5 |
|
Special Male Blood Dog Long Arm |
|
|
|
.66 |
Siren Special Male Blood Dog |
|
|
|
|
|
|
|
|
|
|
1 |
|
Rumbler Flesh Hound* Bloat* Tendril |
Rumbler Flesh Hound Bloat Tendril |
Flesh Hound Bloat Tendril Spider |
|
1.33 |
Long Arm Rumbler Flesh Hound Bloat |
|
|
|
|
1.5 |
|
Spider |
|
|
|
2 |
Tendril |
|
Spider* Brute/Leaper |
Brute Leaper |
|
2.5 |
|
Brute/Leaper* |
|
|
|
2.66 |
Spider |
|
|
|
|
3 |
|
|
|
|
|
3.33 |
Brute Leaper |
|
|
|
Note: Asterisk (*) indicates that not all hits need to be critical to achieve death in the specified time.
If we compare these charts for Elite weapons and Epic weapons side by side, we see that increasing proficiency does not always offer clearly improved performance against the zombies encountered by students living in Fort Pastor.
The 105-proficiency Wakizashi’s results are mixed, compared to the 100-proficiency Battle Axe/Katana. The Wakizashi cannot one-hit-kill Sirens or Special Males, and it takes slightly longer to kill Long Arms and Rumblers. It does kill Blood Dog’s, Flesh Hounds, Bloats, Spiders, Brutes, and Leapers slightly faster.
The 110-proficiency Nodachi is clearly superior to the Battle Axe/Katana and to the Wakizashi. The Nodachi can kill every zombie either as fast as or faster than either of those two weapons.
The Alpha Bull and the VSS Vintorez Rifle (which duplicate each other’s performance) stack up pretty well against the new competition: both of them can kill Long Arms and Rumblers in less than a second. If students cannot afford a new primary weapon, or if they prefer to work on another proficiency, they can continue to use either of these weapons for the time being.
The 110-proficiency 475 Magnum automatic pistol is not an enormous improvement over the 100-proficiency Alpha Bull revolver. Unlike the Alpha Bull, the Magnum cannot one-hit-kill Special Males. Although the Magnum can kill Long Arms slightly faster, it lags behind the Alpha Bull against Rumblers. The Magnum also has a slight advantage against Flesh Hounds, Bloats, and Blood Dogs, Long Arms, Tendrils, Brutes, and Leapers, but that is due to faster firing speed; therefore, a successful kill often requires more consecutive critical hits, lowering the odds that a kill will actually be completed in the specified time.
Despite its slower firing speed, the Rex 577 does an impressive job against Red Zone Zombies. It can one-hit-kill Blood Dogs and Long Arms. It kills Rumblers and Flesh Hounds in one second, and it finishes off Spiders, Brutes, and Leapers in two seconds. (Note that killing a Spider requires only two critical hits and one non-critical hit, increasing the odds of success.)
The 120-proficiency Ironsight rifle is the big game weapon par excellence in the Red Zones, one-hit-killing both Long Arms and Rumblers. Like the Rex, it kills Flesh Hounds Bloats and Tendrils in one second, and Brutes and Leapers in two. It beats the Rex against Spiders, which the Ironsight fells in one second.
Students using Rifles as a primary weapon should get an Ironsight at Fort Pastor to take full advantage of its superiority in the Red Zones – even if that means shortchanging secondary or tertiary weapon. By the time students reach Secronom Bunker, the advantage will have faded: that outpost is in the middle of the Black Zones, where ordinary Long Arms and Rumblers are replaced by Burned and Irradiated versions, which the Ironsight cannot one-hit-kill.
So what conclusions do we reach? Should all seniors stat-reset to get an Ironsight?
Not necessarily. Though the advantage of the Ironsight, compared to other kinds of looting weapons, is obvious, seniors can succeed in the Red Zones with other weapons:
Melee:
- As always, this weapon type has the advantage of silence, which is important in areas where even hearing-range aggro can rouse a mob. Working quietly with a Nodachi, students can navigate Red Zones with care. The slow striking speed might be a concern, but if a student can pull out a chainsaw when the zombies swarm, he/she should be relatively safe.
Pistols:
- Seniors working on a build with stats optimized for Automatic Pistols should try out the 475 Magnum to see how it works for them. Students with stats optimized for Revolvers should stick with the Alpha Bull until they can afford to move on to a 120-proficiency weapon.
Rifles:
- As we have noted, the VSS Vintorez will perform decently in the Red Zones – at least well enough students can obtain a Rex and then an Ironsight. The Rex can one-hit-kill Long Arms, which is a useful advantage that makes the upgrade worthwhile.
- The Rex and the Ironsight are long-range rifles with Very High Accuracy. Their slower firing speed (compared to the VSS and the Dragon SVD) is a concern, but as long as students have open space and good Agility, they should be able to outmaneuver zombies.
- At this point, we should recall the existence of the Rebellion rifle. This is a so-called “Unique” item, which cannot be looted on the streets of Fairview but which is available in the Credit Shop. Normally, our Scientific Minimalism eschews “Unique” weapons, but the Rebellion is worth mentioning because it is a 40-proficiency rifle that performs better than the 100-proficiency VSS. Students developing Rifles as their tertiary weapon will find the Rebellion most useful.
- The Rebellion makes an excellent companion for the Nodachi. With the Nodachi, students get the advantages of silence and great DPH, enabling them to kill Blood Dogs, Bloats, and Flesh Hounds slightly faster. With the Rebellion, students get the advantages of range and faster firing rate, enabling them to more quickly kill Long Arms, Rumblers, Tendrils, Brutes, and Leapers.
LOOTING AROUND FORT PASTOR
With a Nodachi and a Steel 090 in hand, and a body encased in good armor, students will be virtually invulnerable while looting near Fort Pastor. The Nodachi will quietly dispatch the Common Zombies; the Steel 090 will quickly clear any pockets of aggro. Students able to loot profitably around Precinct 13 will do well here.
The only potential problem is that, once past Level 40, seniors will need the kind of food and medication (Red Wine, Nerotonin-2) that are seldom found near FP, necessitating loot trips into the Red Zones.
Looting in the Red Zones requires a readjustment, but seniors will adjust quickly. Initially, stick to the Red Zones on the border of the Orange Territory – the transition will be less of an ordeal.
The Long Arms and Rumblers will take longer to kill (except for students carrying an Ironsight rifle). The population density makes it more difficult to target specific loot spots. No longer will students be able to simply kill everything in sight until the loot spot is clear. Instead, students may have to bypass difficult situations and search for “low-hanging fruit” – i.e., easy loot spots.
Often, upon entering a new area, students can grab something near the intersection before the zombies take notice. After that, students should seek loot behind bushes, cars, and other obstacles that will provide a moment’s breathing room; better yet are lootable cars, which will shield students from approaching zombies.
If students move softly, using silent Melee weaponry, they stand a decent chance of looting several spots before provoking aggro. If aggro does strike, a Steel 090 will provide enough protection to make a getaway.
After a little experience, students will start to fall into a rhythm. Some areas may be too agitated: all looting efforts will be thwarted, forcing a move to the next block. Eventually, the tide will shift, and students will manage to grab a few loot items with surprising ease. But don’t stop for self-congratulation; keep moving and looking for easy loot spots.
After building up confidence, students can even try grinding through the zombies to clear the area for looting. This works best in relatively secluded spaces: fenced parking lots, etc. With luck, students can kill every zombie inside the fence or wall before others get inside, resulting in a moment's grace period to loot undisturbed.
Students can also loot inside buildings. There is an increased danger of getting trapped in a dead end corridor. On the plus side, zombie density tends to be lower inside, and there are more walls and obstacles that offer protection.
The increased danger of Red Zones is worth the risk. Students will find the loot needed to survive, and they will have an increased chance of finding weapons and armor that can be sold for decent cash in the Fort Pastor marketplace.
SENIOR-LEVEL GRINDING WEAPONS
Next, let’s take a look at the grinding weapons that students might need during senior semester at Fort Pastor. There is a bewildering array of options, which we have tried to break down in the charts below. However, the numbers in these charts reveal only so much. What matters is not just how much DPS the weapons inflict; just as important is how much DPS is actually needed.
The math is convoluted, but the bottom line is this: If one considers the average health points of the zombies in the area, multiplied by the maximum number of zombies that appear at anyone instant, and factor in how rapidly they spawn, there are not many situations around Fort Pastor that require the use of epic-level Heavy Machine Guns.
In most cases, a Sub Machine Gun, an Assault Rifle, a Shotgun, or a Chainsaw will do the job. Students who have yet to raise proficiency for their second weapon to 100 can get by with an AK 47, a K-50M, or a Sweeper. Students who have raised Melee proficiency for a Battle Axe or a Nodachi will be able to use a Grinder or a Steel 090.
Heavy Machine Guns become important for a handful of mass extermination missions (such as "Spiders, Spiders Everywhere"), in which agro is so high that it can easily overwhelm mid-level weapons. In this case, the DPS and knockback of a Vulcan mini-gun are more necessity than luxury.
Massive DPS and knockback are also useful while hunting the more dangerous boss zombies in the area. Skilled students can probably take out Wraiths and Giant Spiders with a Chicago Typewriter or an USAN 12, but Flaming Wraiths and Flaming Giant Spiders will shrug off the knockback of lesser weapons. To take out these creatures requires at least an FM Mitrail.
As a general rule, we recommend starting with at least a Chicago Typewriter or a Sweeper, depending on whether a student is using Machine Guns or Shotguns. Upon encountering a situation in which that weapon is inadequate, upgrade to the next higher weapon in that category. When satisfied with the Machine Gun or Shotgun, it is then possible to add a Grenade Launcher for extra DPS - the HK69 won't do much in a boss fight, but it is great for exterminating masses of zombies from a safe hiding place (behind a wall or a fence).
The following charts are recommended as reference for quick comparison-and-contrast when students are contemplating an upgrade to a new grinding weapon with more DPS. Numbers for the Reloading stat are recommendations based on the clip size of weapons (i.e., a Vulcan holding 300 rounds needs less Reloading that a K-50M holding 35 rounds).
First, Sub Machine Guns and Assault Rifles:
|
SUB MACHINE GUNS & ASSAULT RIFLES |
||||||
|
WEAPON |
Chicago Typewriter |
XM8 |
AK 47 |
K-50M |
M4 |
Criss Victor |
|
TYPE |
SMG |
AR |
AR |
SMG |
AR |
SMG |
|
PROFICIENCY |
70 |
70 |
80 |
90 |
100 |
105 |
|
STRENGTH |
30 |
50 |
60 |
30 |
30 |
30 |
|
ACCURACY |
49 |
49 |
49 |
49 |
49 |
49 |
|
CRITICAL HIT |
124 |
80 |
80 |
124 |
80 |
124 |
|
RELOADING |
124 |
75 |
124 |
124 |
120 |
124 |
|
FIRING RATE |
8.57 |
8.57 |
8.57 |
8.57 |
8.57 |
8.57 |
|
CLIP SIZE |
50 |
100 |
35 |
35 |
60 |
40 |
|
DPH |
7/35 |
10.6/53 |
10.6/53 |
9.1/45.8 |
15.4/77 |
9.16/45.8 |
|
DPS |
60/108 |
90/107 |
111/131 |
78.5/149 |
132/153 |
83.8/158 |
|
DPC |
350/630 |
1060/1230 |
455/528 |
318/574 |
924/1072 |
366/660 |
|
SHOTGUNS, CHAINSAWS & GRENADE LAUNCHERS |
||||||
|
WEAPON |
HK 69 |
Sweeper |
USAN-12 |
Grinder |
Steel 090 |
AA-12 |
|
TYPE |
GL |
SG |
SG |
CS |
CS |
SG |
|
PROFICIENCY |
40 |
80 |
100 |
100 |
110 |
110 |
|
STRENGTH |
25 |
80 |
100 |
50 |
50 |
100 |
|
ACCURACY |
80 |
49 |
49 |
N.A. |
N.A. |
49 |
|
CRITICAL HIT |
N.A. |
25 |
N.A. |
112 |
112 |
N.A. |
|
RELOADING |
124 |
124 |
120 |
N.A. |
N.A. |
110 |
|
FIRING RATE |
1 |
2 |
3 |
8.57 |
8.57 |
3 |
|
CLIP SIZE |
1 |
12 |
20 |
N.A. |
N.A. |
32 |
|
DPH |
315 |
40 |
35.6 |
3/15 |
4/20 |
42.32 |
|
DPS |
315 |
80 |
107 |
27/108 |
144 |
127 |
|
DPC |
315 |
480 |
712 |
∞ |
∞ |
1354 |
|
HEAVY MACHINE GUNS |
||||
|
WEAPON |
FM MITRAIL |
FM MAG |
M60 |
Vulcan |
|
TYPE |
HMG |
HMG |
HMG |
Mini-Gun |
|
PROFICIENCY |
90 |
100 |
100 |
110 |
|
STRENGTH |
80 |
100 |
100 |
100 |
|
ACCURACY |
49 |
49 |
49 |
49 |
|
CRITICAL HIT |
80 |
80 |
80 |
80 |
|
RELOADING |
124 |
120 |
100 |
100 |
|
FIRING RATE |
12 |
12 |
12 |
12.24 |
|
CLIP SIZE |
45 |
80 |
200 |
300 |
|
DPH |
12.6/63 |
15.5/77.5 |
15.5/77.5 |
19.41/97 |
|
DPS |
151/175 |
186/216 |
186/216 |
237/256 |
|
DPC |
567/658 |
1240/1438 |
3100/3596 |
5823/6288 |
Note: Undergraduate students will have little trouble getting proficiency points in place for Heavy Machine Guns and Shotguns by Level 50. However, it may be difficult to get the necessary stat points in Strength without shortchanging other stats.
GRINDING AROUND FORT PASTOR
Grinding in the vicinity of Fort Pastor does not require ultra-high-DPS weaponry. A Steel 090 chainsaw is sufficient to the task; so is the K-50M submachine gun, the AK 47 and the M4 assault rifles, the USAN and AA-12 shotguns. Heavy Machine Guns would certainly grind faster, but we do not recommend shortchanging other stats in a race to raise Strength to 100. After all, an HK 69 can provide more DPS without place a strain on stat allocation.
Aggro can certainly be more intense, especially in the Red Zones, but by now senior students should have enough experience, equipment, skills, and stats to handle most of the threats. Even high-aggro situations, such as outpost attacks, will cease to be a question of survival; instead, the question will be how much experience can be earned.
The main exceptions to this general rule are the more demanding extermination missions, such as “Spiders, Spiders Everywhere.” The sheer number of attacking arachnids is so great that students can easily find themselves overwhelmed and eaten. A Heavy Machine Gun is a worthwhile investment for students planning to attempt these missions.
Keep in mind that most of the grinding weapons suggested for this outpost are better suited to “Defensive Grinding”: they will not obliterate the opposition in the blink of an eye; rather, they will hold the zombies at bay while slowly eating away at their numbers. This means that students usually need to keep circling and dodging while waging a slow war of attrition.
Seniors may occasionally encounter aggro that exceeds either their skill level or their equipment capabilities. In such cases, students have three options: retreat from the area; enhance abilities with drugs (Speed Boost and/or Damage Boost); or find a fences to hide behind while spraying hot lead into the crowd.
BOSS HUNTING NEAR FORT PASTOR
Students residing at Fort Pastor will encounter Boss Zombies in Yellow, Orange, and Red Zones. It is theoretically possible that some of these bosses were lurking around Precinct 13, but it is more likely that students will be meeting many of them for the first time during their senior semester at Fort Pastor, especially because they show up in this outpost’s missions.
|
Fort Pastor Boss Zombies |
||||
|
SPECIES |
HEALTH |
DPH |
EXPERIENCE |
ZONES |
|
Giant Spider |
15,000 |
80 |
20,250 |
O, R, B |
|
Wraith |
15,000 |
80 |
20,250 |
O, R, B |
|
Burning Giant Spider |
30,000 |
150 |
40,500 |
O, R, B |
|
Burning Wraith |
30,000 |
150 |
40,500 |
O, R, B |
|
Black Titan |
100,000 |
400 |
200,000 |
R, B, W |
Clearly, these Boss Zombies are hard to kill, and they inflict serious damage. They also tend to be fast, though their speed manifests in different ways (Wraiths move in rapid spurts; Spiders maintain a steady advance).
Students can find specific strategies in the “Scientific Minimalist Approach to Dead Frontier Boss Hunting,” but here are a few general tips:
With the right weapons and good dodging skills, it is possible to kill Wraiths and Giant Spiders with single-fire weapons, even with Melee and/or Chainsaws. However, it is often safer to use rapid-fire weapons (Shotguns or Machine Guns), which offer protection from the surrounding aggro. Heavy Machine Guns are fastest, but with good dodging skills, Submachine Guns and Assault Rifles have enough knockback to keep a student alive until he/she can kill the beast.
Machine Guns and Shotguns work better against Giant Spiders than against Wraiths. These weapons are not very accurate, and Wraiths tend to dart suddenly from across the screen – too far for a machine gun to hit much more than air. Giant Spiders, on the other hand, run so fast that they always have their nose right in front of the barrel, negating any need for long-range accuracy.
Burning Wraiths, Burning Giant Spiders, and Black Titans are so powerful that they will walk through mid-level machine gun fire as if it were a light breeze. Slowing them down requires a Heavy Machine Gun or a Shotgun, and even those are no guarantee of success.
Seniors can compensate for their lack of high-level weapons by using Damage Boost drugs, which will shorten the amount of time needed to kill a boss. However, in order to bring one of these last three monsters down, students need to avoid being summarily dispatched – which means moving fast enough to stay out of reach Expert dodging may keep students alive, but Speed Drugs are a more likely means of survival. The other alternative is to hide behind a fence and hope the boss does not find the entrance.
Students can find specific strategies in the Scientific Minimalist Guide to Boss Hunting.
MISSIONS AT FORT PASTOR
There are 43 missions at Fort Pastor. Some are virtually identical to previous missions: though the descriptions may vary, the actual tasks are the same (e.g., find cans of fuel). Others will test the limits of equipment and capabilities, pitting students against a pair of Giant Burning Spiders or against a rampaging Black Titan.
Most of the Fort Pastor missions can be accomplished with the weapons we have suggested; some of the easier ones can even be attempted when seniors first arrive, before upgrading equipment. Only a small handful of difficult missions (involving boss hunts or mass extermination) will have students wishing for more advanced weaponry.
These latter missions are difficult to complete without employing one of the following options:
- Hang around Fort Pastor for a few more levels, to equip a 120-proficiency SCAR 9000 mini-gun.
- Take the Speed and/or Damage boost drugs to enhance abilities long enough to complete the mission.
Performance enhancing drugs are expensive but not as expensive as a brand new mini-gun. Economically, the drugs may make sense, since there are only a few missions that cannot be easily completed without them: “Spiders,” “One Big Ass Spider,” “Spiders, Spiders Everywhere,” “Sixteen Legs,” and “Big Black Thing.” Of these, the first four can be managed with the right skills, tactics, and decent equipment. Only the last one is virtually impossible without a little performance boost.
Study useful strategies in the Scientific-Minimalist Guide to Fort Pastor Missions.
FORT PASTOR SUMMARY
Looting and grinding near Fort Pastor are not tremendously more difficult than they were around Precinct 13. However, Fort Pastor has more difficult missions and places students in closer proximity to more dangerous Boss Zombies. Also, students are more likely to use this outpost to venture into the more dangerous Red and or Black Zones.
Assuming that students remain at Fort Pastor until completing their senior semester at Level 50, they will amass enough points in Stats and Proficiency to handle dangerous up to an including the Black Zones. By following any of the weapon progressions we have outlined, students will be able to equip two high-end weapons, one for looting and one for grinding, which should enable them to make the move to Secronom Bunker.
GRADUATION DAY!
Congratulations! This course completes Zombie Hunter University's under-graduate program in the Scientific Minimalist Theory of Dead Frontier Weapons, Builds, Looting, Grinding, Missions & Boss-Hunting. Students who have completed the requirements to earn their Bachelor's Degree in Scientific Minimalism are now equipped to survive the myriad dangers and challenges of Fairview.
It is time to embark upon postgraduate studies at even more difficult levels: the Black Zones around Secronom Bunker, the White Zones beyond, and (after Level 100) the Wastelands near Precinct 13. Zombie Hunter University does is currently developing a post-graduate program covering these topics, but students should have acquired the necessary skills and knowledge to find their own way from this point onward.
Good luck! And Happy Zombie Hunting!
Click here to proceed to the lesson guide for Secronom Bunker.

Matriculated
1251831