Critical Build #3: Boxer with Melee, Chainsaw, SMG, Rifle
|
Critical Build #3 with Boxer Profession
Optimized Stats at Level 95 |
||||||||||||||
Notes:
|

We highly recommend Critical Build #3 for beginning students. This build is effective, economical, and versatile - perhaps the best example of a "Scientific-Minimalist" approach to Dead Frontier, using weapons that are necessary for the job at hand - not necessarily the most fashionable.
Critical Build #3 is well suited to both looting and grinding. It lacks the firepower of Heavy Machine Guns and/or Grenades, making it less effective for mass extermination missions. However, using Chainsaws cuts down on the cost of feeding expensive ammunition into Machine Guns.
Critical Build #3 resembles Critical Build #1 in terms of weapon proficiency; however, the stat allocation is different because Strength is needed to equip Chainsaws. This alters the build's proficiency development in ways we will illustrate below. For the moment, it is enough to note that, with Chainsaws for grinding, students have the option of placing a lower priority on optimizing firearms.
The build is more stat-hungry that Critical Build #1, but it is still relatively easy to achieve by Level 50. Undergraduates from freshmen through senior level can achieve considerable success in Dead Frontier's first four outposts. The build's limitations become apparent only when after graduating to Black Zones around Secronom Bunker, by which time students will have a better idea of whether they want to stick with this build or stat-rest to something different.
This lesson includes the following chapters:
- Weapon Progression
- Undergraduate Program: Taking Weapons & Stats to Level 50
- Outpost-by-Outpost Development Guide
- Postgraduate Program: Taking Weapons & Stats to Level 95
- Alternate, Experimental Version of Build
- Suggestions for Whether to Stat-Reset
UPDATES: The following text was written before major developments that changed the needs for optimizing this build. The changes are as follows
- The total points required to optimize Critical Chance for Submachine Guns have been reduced from 124 to 112. It may contain outdated references to maxing Critical Chance stat, which is no longer necessary.
- /zombies such as Bloats and Mothers no longer explode when killed with melee weapons or chainsaws. Therefore, it is no longer necessary to interrupt the development of the Melee proficiency in order to equip an SL8 rifle at Level 18 to kill these zombies from a safe distance. Students may simply continue using raising Melee proficiency, relying on chainsaws and melee to kill these creatures up close.
CRITICAL BUILD #3: WEAPON PROGRESSION
Below is the suggested weapon progression for this build. Boldface indicates weapons worth holding onto while raising other proficiency or earning cash to purchase the next weapon. Other weapons are placeholders, skipped over or swapped out as soon as possible.
Critical Build #3 Weapon Progression:
- Pen Knife/Beta Tomcat/Other Stat Boosters
- Iron Pipe (20 – Level 2)
- Shovel (50 - Level 8)
- Ronan Pro (60 – Level 10)
- Sabre & Steel MS800 (80 – Level 14)
- SL8 (20 – Level 18)
- Battle Axe/Katana & Grinder (100 – Level 22)
- M16/FM FNC/SA80/Mesa ACR (40 – Level 30)
- Stell Aug (45 – Level 31)
- XM8 (70 - Level 36)1
- Nodachi & Steel 090 (110 – Level 38)
Standard Weapon Progression:
- M1 Garand (40 – Level 42)2
- K-50M (90 – Level 46)
- M4 (100 – Level 48)
- Spiker & Ripsaw G12 (120 – Level 50)3
- Criss Victor (105 - Level 53)4
- Uziel (120 - Level 60)
- Chesterfield (50 - Level 65)
- MSG-9 (60 - Level 70)
- SIC 550 (75 - Level 78)
- Hawk OP96 (80 - Level 80)
- Dragon SVD (90 - Level 85)
- VSS Vintorez (100 - Level 90)5
- 577 Rex (110 - Level 95)6
Experimental Weapon Progression:
- Rebellion (40 – Level 42)2
- K-50M (90 – Level 46)
- M4 (100 – Level 48)
- Spiker & Ripsaw G12 (120 – Level 50)3
- Criss Victor (105 - Level 53)4
- Uziel (120 - Level 60)5
- HK69 (80 - Level 80)
Notes:
- A Chicago Typewriter could also be equipped at Level 36, but it has a smaller clip size. Raise Reloading before switching to the Typewriter.
- The weapons equipped at Level 42 are different in the two versions of this build, but the actual weapon proficiency is identical through Level 60
- Upgrade to a Dual Blade and a Goretooth chainsaw when finances allow.
- The limited-edition Corpse Ripper is a superior alternative for those who can afford one.
- At Level 60, thanks to the Rebellion, the Preferred Weapon Progression has as much firepower as the Standard Version has at Level 90.
- The expensive, limited-edition Corpse Piercer is better than the Rex, almost as good as a 120-proficiency Ironsight.
Though Critical Build #3 raises the same three proficiences as Critical Build #1, the weapon progression proceeds along a different route: Machine Gun Proficiency is not raised as quickly, because Chainsaws are available to handle some grinding duties. Many Chainsaws equal or surpass Sub Machine Guns in DPS. For example, with a 120-proficiency Ripsaw in hand (providing 216 DPS), there is less urgency to obtain a 120-proficiency Uziel (with 211 DPS).
For the same reason, the build does not equip a 105-proficiency Criss Victor by Level 50: the sub machine gun's slight improvement in DPS over the M4 assault rifle is not significant when a Ripsaw is available to do the grinding work.
Students who want to fill the machine gun gap between the M4 and the Uziel may equip the Criss Victor or consider the 105-proficiency Corpse Ripper sub machine gun, which is a more substantial improvement than the Criss Victor - but also more expensive, being a limited-edition collector's item.
Critical Build #3 omits the Knives that were included in Critical Build #1. Their slightly faster attack speed offers less advantage to a build that uses chainsaws to fend off zombie hordes. Melee is reserved for picking off individual targets - a job that can be accomplished with the Blades and Blunts that have Very Slow Attack Speed.
Like Critical Build #1, this build relies on Melee for silent looting, switching to Rifles to target zombies that are dangerous up close. Depending on a student's skill-set and style, Rifles can play a more important role in Critical Build #3: with Chainsaws taking over much of the grinding duty from Sub Machine Guns, students will find themselves capable of completing many tasks with only Melee, Chainsaws, and Rifles.
To do this effectively, Carbine Rifles, with their slightly faster firing rate, are preferable in densely populated areas from Fort Pastor onward. Until then, Bolt-Action Rifles with Very Slow Firing Speed will suffice.
The bolt-action SL8 is good early in build development because its large ammo capacity (30 rounds per clip) make it effective even with no stat points in Reloading. The M1 Garand is a solid upgrade when Reloading stat is high enough so that the rifle's smaller clip size is not an issue.
The two versions of this build diverge upon reaching 40 Rifle Proficiency. The Standard Version equips the affordable M1 Garand; the preferred version equips the Rebellion, a "unique" (i.e., unlootable) carbine that offers decent firing speed (1.5 shots per second) and More Damage Per Second than any Rifle up to and including the 100-proficiency VSS Vintorez. The Rebellion is expensive but worth the price.
Critical Build #3 reaches Level 50 capable of equipping a Spiker, a Ripsaw G12, a Rebellion, and an M4. After Level 50, Critical Build #3 raises Machine Gun Proficiency to 120 for the Uziel 14. More expensive Chainsaws and Sub Machine Guns will be acquired later, when finances are in place.
After maxing Machine Gun Proficiency, the Standard Version of Critical Build #3 resumes work on Rifles, obtaining a VSS Vintorez by Level 90 and a 577 Rex by Level 95, which we consider to be the "completion" of the build. Students could continue to raise Rifle proficiency to 120 for the Ironsight, XLGunner-8, Worg, and Longshot, but these Very High Critical Chance Rifles require only 80 points in Critical. They will work in this build, but for students who want to equip them, it makes sense to consider a stat reset, to take advantage of the lower Critical requirement.
Note of Explanation: The 577 Rex is also a Very High Critical Chance Rifle, but we do not recommend a stat rest upon purchasing one. Because it is a Bolt-Action Rifle with Very Slow Firing Speed, it is less efficacious for crowd-control than the VSS Vintorez, a Carbine with slightly faster firing speed, which requires 112 points in Critical. Students will want to switch back and forth between the two rifles, depending on the task at hand. Upon reaching 120-proficiency, students will be able to equip both Bolt-Action and Carbine Rifles with Very High Critical Chance; it will no longer be necessary to maintain 112 points in Critical for the Vintorez.
With the Rebellion in hand, the Preferred Version already has a better Rifle at Level 60 than the Standard Version can earn 30 levels later; in fact, it would take 35 levels to obtain a Rifle with more DPS, the 110-proficiency 577 Rex. This grants students the option of working on a different weapon. By Level 80 students could equip an HK69 grenade launcher, which delivers more DPS than the Street Dog sub machine gun or the Goretooth chainsaw.
This rather unorthodox approach - equipping 5 weapons before Level 90 - is still in the experimental stages. If it works as well a hoped, Zombie Hunter University may offer a postgraduate degree in this field.
CRITICAL BUILD #3: UNDERGRADUATE PROGRAM
STAT & PROFICIENCY TARGET NUMBERS
Zombie Hunter University's Undergraduate Program guides students in use of the their builds from Levels 1 to 50, illustrating weapon choice and coordinating stat allocation, to ensure that points are in place to optimize weapons when they are equipped.
Level 50 is the cut-off for completing the undergraduate version of a build and earning a Bachelor's Degree. After Level 50, build development is extremely slow. Whatever long-term goals a graduate has, the undergraduate build is the one that will be used for considerable time.
There are two possible versions of this build; they are identical for the first 30 levels, diverging only during senior semester at Fort Pastor.
This first chart illustrates Stat and Proficiency allocation of the Standard Version through Level 50, whereupon students will complete Zombie Hunter University's undergraduate program - a requirement for earning a Bachelor's Degree in Scientific Minimalism.
|
Critical Build #3 With Boxer
To Level 50 (Undergraduate Program) |
||||||||||||||
Notes:
|
We suggest the Boxer profession for this build. Like the Fireman, the Boxer provides a head start with Melee. The Boxer also begins with extra points in Strength, which makes it easier to equip Chainsaws early without shorting other vital stats.
Critical Build #3 utilizes the same three weapon proficiencies as Critical Build #1: Melee, Rifles, and Sub Machine Guns. Students could theoretically get stats in place for Critical Build #1, then raise Strength to 50 for Chainsaws. Unfortunately, this would delay the use of chainsaws until post-graduate studies; they are most useful during the undergraduate course.
Consequently, stat allocation is different in this build. In order to get Strength in place and invest some points in Endurance, Reloading is delayed, and no points are invested in Accuracy. Students will take longer to optimize firearms, because they will not be relying on Machine Guns as much - Chainsaws will take up the slack until Reloading stat is in place.
After Agility is in place, Critical is raised to 112 to optimize Chainsaws. The stat is not maximized until later, when it is needed to optimize Sub Machine Guns. In the meantime, the build relies on mid-level Assault Rifles, which are less dependent on Critical Hits for their DPS.
For the same reason, we have opted not to maximize Reloading before Level 50: the MX8 assault rifle, with its 100-round clip size, does not rely on Reloading for its performance. Likewise, the 30-round SL8 rifle performs well with few points in Reloading. Melee and Chainsaws, of course, require no Reloading at all.
Students may adjust this development, depending on personal preference: if Melee and Chainsaws are not sufficient to their needs, they may prioritize Reloading over Endurance.
Besides Chainsaws and Assault Rifles, the 50 points invested in Strength also enables the use of some Heavy Armours, such as the Flak Jacket and the SN-42. A more expensive option is the Corpse Carapace, a limited-edition collector's item that provides the same protection as the SN-42 (50% damage absorption) but is four times as durable, thus requiring less repair work. There are non-Strength armors that provide more protection, but they are more expensive than the SN-42.
CRITICAL BUILD #3: UNDERGRADUATE PROGRAM
WEAPONS & STATS BY OUTPOST
This outpost-by-outpost breakdown will clarify the reasoning behind the decisions in the above graphs (e.g., why certain stats should be in place before acquiring certain weapons). While examining the information, remember that these suggestions are not rigid; there is room to adjust for personal style and skill-set.
We suggest that students spend one semester of 10 levels at each of the first three outposts: 1-10 at Nastya's Holdout, 11-20 at Dogg's Stockade, and 21-30 at Precinct 13. Senior semester at Fort Pastor is longer: levels 31-50. During this semester, we will illustrate the divergence that occurs between the Preferred Version and the Standard Version.
|
Critical Build #3 at Nastya's Holdout
Levels 1-10 (Freshman Semester) |
|
|
STATS |
PROFICIENCIES |
|
Strength: 45 |
Melee: 15 + 45 = 60 |
|
Endurance: 25 (49) |
Pistols: 5 |
|
Agility: 25 + 25 = 50 (74) |
Rifles: 0 |
|
Accuracy: 25 (49) |
Shotguns: 0 |
|
Critical Hit: 25 + 20 = 45 (69) |
Machinegun: 0 |
|
Reloading: 25 (49) |
Explosives: 0 |

Note that the Boxer's 10 bonus points in Melee allow students to equip these weapons two levels sooner than with other professions. Twenty extra points in Strength make it easy to equip Chainsaws without shorting other stats during the first two semesters. (In fact, students will need to add only 5 more points to Strength, which can wait until they add a Grinder when upon reaching Precinct 13.)
Recommended Weapons:
- Melee: Iron Pipe, Shovel
- Chainsaw: Ronan Pro
Recommended Armours:
- Non-Strength: Sports Armour
Proficiencies:
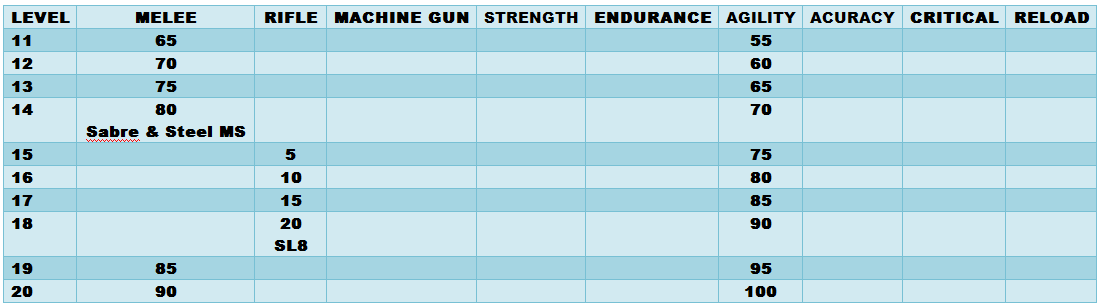
- Raise Melee to 20 for the Iron Pipe, then 50 for Shovel, then 60 for Ronan Pro.
Stats:
- Add 25 points to Agility, raising total to 50, and supplement that with Mastercrafted armor stats to get close to 74.
- Add 20 points to Critical Hit, raising total to 45, and supplement that with Mastercrafted weapons to get close to 69.
Critical Build #3 gets off to a faster start than other builds, because Melee proficiency combined with Strength enables the use of two weapons. Thus, while other students are working on a single looting weapon, students with this build have access to Melee for Looting and Chainsaws for grinding.
Students can alternate raising Agility and Critical in 5-point blocks for each of the first 10 levels. Some experts suggest maxing Agility first, but the lethargic pace of the Blue Zone zombies near Nastya's Holdout should give leeway to split stat points. 60-70 in Agility is more than enough to comfortably dodge the local zombies, including agro swarms and Flaming Zombies.
An Iron Pipe is all that is needed to against local threats. Its damage per critical hit is 35; the strongest normal zombie in Blue Zones is the Fat Male, with 34 Health points. Thus, the higher DPH of later Melee weapons is useless except against the Flaming Zombie, a boss that spawns occasionally near Nastya's Holdout.
The extra DPH of the 50-proficiency Shovel (53 per Critical Hit) will not kill local zombies any deader than the Iron Pipe. However, the Shovel has a tangible advantage: it is a Very High Critical Chance weapon, requiring only 80 total points in that stat to achieve an 80% Critical Hit Rate. This means it will deliver more Critical Hits than the Iron Pipe, killing local zombies with a single blow more often. The Shovel will also kill Flaming Zombies faster, and it will prove useful against Burned and Irradiated Zombies when students depart Nastya's Holdout. For these reasons, we recommend having a Shovel in hand before moving to Dogg's Stockade.
Upon reaching 60 proficiency in Melee, students should equip the Ronan Pro, which is the first chainsaw worth purchasing. The Ronan Pro requires 35 points in Strength; fortunately, the Boxer starts with 45 points in this category, so this stat is already in place.
At this point, students will have all the weapons they need in Nastya's Holdout, and their stats should be sufficient to navigate the local dangers with ease. It is time to advance to the next outpost.
Students who are not confident about their skill set can remain in Nastya's Holdout a while longer, leveling up an extra time or two to work on stats. Although maximum Agility is unnecessary around Nastya’s Holdout, being able to move faster is an advantage when making the long walk to Dogg’s Stockade.
|
Critical Build #3 at Dogg's Stockade
Levels 11-20 (Sophomore Semester) |
|
|
STATS |
PROFICIENCY |
|
Strength: 45 |
Melee: 60 + 30 = 90 |
|
Endurance: 25 (49) |
Pistols: 5 |
|
Agility: 50 + 50 = 100 (124) |
Rifles: 0 + 20 = 20 |
|
Accuracy: 25 (49) |
Shotguns: 0 |
|
Critical Hit: 45 (69) |
Machine Gun: 0 = 0 |
|
Reloading: 25 (49) |
Explosives: 0 |
Recommended Weapons:
- Melee: Sabre
- Chainsaws: Steel MS800
- Rifles: SL8 Rifle
Recommended Armour:
- Non-Strength: Zylon Vest, Kevlar Vest
- Strength: Flack Jacket
Proficiencies:
- Add 20 to Melee for Sabre and MS800
- Add 20 to Rifle for SL8
- Add 10 to Melee (for later use)
Stats:
- Agility: Add 50
Sophomores following the instructions for Critical Build #3 should be carrying a Shovel and a Ronan Pro when they arrive in Dogg's Stockade for their sophomore semester. These weapons may have been overkill at Nastya’s Holdout, but they will help in the Green and Yellow Zones until students can level up as indicated.
Upon reaching 70 Melee proficiency, skip the Wood Axe and the Machete (two different looking weapons with identical performance). The extra DPH (65 for a Critical Hit) offers minimal advantage: like a Shovel, a Wood Axe/Machete takes two hits to kill Sirens, Irradiated Zombies, and Blood Dogs; the only difference is that only one of the hits needs to be Critical. Since students will soon have an SL8 rifle with the same DPH, the Wood Axe/Machete is unnecessary.
In any case, sophomores will trade in their current Melee weapons as soon as they raise proficiency to 80 for the Sabre – which is essential because of its ability to one-hit-kill a Siren. Sirens provoke agro with their screams, so it is essential to silence them instantly if at all possible.
Besides a Sabre, 80 points in Melee skill also allow sophomores to obtain a Steel MS800 Chainsaw for grinding purposes. This weapon requires 40 points in Strength; fortunately, students with a Boxer profession already have 45 points in Strength, so there is no need to add points to this stat at this time. Although sophomores will not be able to optimize the MS800 with 112 points in Critical Hit, the device will function adequately against local threats.
At this point in the build development, it would be possible to continue raising Melee Proficiency to 110, but in Dogg's Stockade, stronger Melee weaponry is unnecessary and may even be counterproductive. To cite one example: a Nodachi will kill a Small Bloat with a single blow, subjecting the student to the explosive impact of the zombie's death-blast.
For this reason, we recommend holding Melee at 100 and adding 20 points to Rifle proficiency for an SL8 to pop bloats from a safe distance. Students will use the SL8 against zombies that are too dangerous to approach closely, such as Reapers with their long, scythe-like arms and Irradiated Zombies, which spew projectile vomit.
Why stop at 20 for an SL8 instead of raising Rifle proficiency to 30 for an M24, which offers more DPH? Two reasons:
- The SL8 has a 30-round capacity. Firing continuously at once per second, the SL8 reloads only every half-minute. This is a huge advantage to Melee-Chainsaw students who are still working on Critical Hit and Strength before moving on to Reloading. The M24, though it does more damage per shot than the SL8, has a smaller ammo capacity, which results in reloading every four or five seconds.
- A student with a Sabre for looting and a MS800 for grinding will be using the SL8 in limited circumstances, so there is little sense in splurging on a more expensive rifle, especially when stats, particularly Reloading, are not in place to optimize it.
By keeping Rifle Proficiency at 20 for the SL8, sophomores can resume work on Melee. Upon reaching 90-proficiency, skip the Sledge Hammer and wait to get a Battle Axe/Katana next semester.
Following this plan, students will be able to obtain this build's recommended weapons before reaching Level 20. With no need to invest in Reloading and Accuracy this semester, Agility can be maximized by Level 20, before making the long trek south to Precinct 13.
|
Critical Build #3 at Precinct 13
Levels 21-30 (Junior Semester) |
|
|
STATS |
PROFICIENCIES |
|
Strength: 45 +5 = 50 |
Melee: 90 + 10 = 100 |
|
Endurance: 25 + 2 = 27 (51) |
Pistols: 5 |
|
Agility: 100 (124) |
Rifles: 20 |
|
Accuracy: 25 (49) |
Shotguns: 0 |
|
Critical Hit: 45 + 43 = 88 (112) |
Machinegun: 0 + 40 = 40 |
|
Reloading: 25 (49) |
Explosives: 0 |
Recommended Weapons:
- Melee: Battle Axe/Katana
- Chainsaw: Grinder
- Rifle: SL8
- Machine Guns: M16/FM FNC/SA80/Mesa ACR
Recommended Armour:
- Strength: SN-42
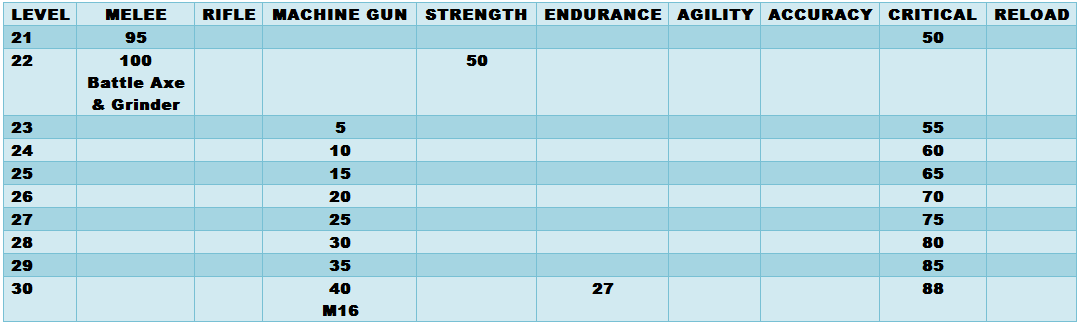
Proficiencies:
- Add 10 to Melee for Battle Axe/Katana and Grinder
- Add 40 to Machine Gun for M16/FM FNC/SA80/Mesa ACR
Stats:
- Strength: Add 5 for the Grinder upon reaching 100 Melee proficiency at Level 25
- Agility: Add 25 to max this stat
- Critical Hit: Add 43
- Endurance: Add 2
Students working on Critical Build #3, with Melee and Chainsaws, should reach 100 Melee Proficiency during junior semester at Precinct 13, enabling the purchase pf a Battle Axe or a Katana.
Simultaneous with raising Melee Proficiency to 100, juniors should raise Strength to 50 so that they can equip a Grinder Chainsaw, which rips through zombies much faster than the Steel MS800.
The combination of Battle Axe/Katana and Grinder is strong enough to counter the increased danger level near Precinct 13, including Tendrils and Spiders in the Orange Zones.
Next, juniors should raise Critical Chance to 88 (plus bonus stats) to optimize the Grinder. Students will not completely max Critical until later. Instead, add the 2 remaining stat points to Endurance. The added Health Points and longer Sprint Time granted by this stat are an important advantage for students relying on hand-to-hand combat with Melee and Chainsaws.
At this point, students face a choice: continue raising Melee proficiency, or work on another weapon. The additional advantages of a Nodachi and a Steel 090 chainsaw are negligible against the threats near P13, so we advise turning attention to Machine Guns.
In this regard, Critical Build #3 has an advantage over Critical Builds #1 and #2: the investment in Strength for Chainsaws also allows the use of low-level Assault Rifles instead of Sub Machine Guns.
Assault Rifles at this level have two advantages over their SMG equivalents:
- Assault Rifles are less reliant on Critical Chance for their Damage Per Second, so students can hold off on maxing this stat.
- Assault Rifles have larger ammunition capacity, which makes Reloading less important.
Let us illustrate with a comparison.
Upon reaching Level 30, students will have invested 40 points in Machine Gun proficiency. This is enough to equip either a Gramm M11 sub machine gun or an M16 assault rifle. The Gramm holds 16 rounds per clip; the M16 holds 30. At maximum Critical Hit, the Gramm inflicts 84.69 DPS. The M16's DPS is 90.86 with no Critical at all; with the stat raised to 112 (as it should be by now), the M16 inflicts approximately 105 DPS - 20 more than the Gramm. The M16 is clearly superior. (Note: The FM FNC, SA80, and Mesa ACR assault rifles offer the same performance as the M16; the only difference is appearance.)
Critical Build #3 winds up junior semester with two looting weapons and two grinding weapons. The Battle Axe takes out most common zombies quickly and quietly with a single blow. The SL8 safely dispatches exploding and vomiting zombies. The Grinder handles most of the agro. The M16 takes over closer-quarter combat threatens to overwhelm the chainsaw. No other build offers this many options at this stage in the development.
*
Precinct 13 puts students within range of the Wastelands. Adventuresome juniors may be tempted to explore this dangerous territory south of Fairview City, but we would not recommend it. Stat and Weapon proficiency at this point is not up to the challenge. The wiser plan is to proceed to Fort Pastor.
|
Critical Build #3 at Fort Pastor
Levels 31-50 (Senior Semester) |
|
|
STATS |
PROFICIENCY |
|
Strength: 50 |
Melee: 100 + 20 = 120 |
|
Endurance: 27 + 40 = 67 (74) |
Pistols: 5 |
|
Agility: 100 (124) |
Rifles: 20 + 20 = 40 |
|
Accuracy: 25 (49) |
Shotguns: 0 |
|
Critical Hit: 88 + 9 = 97 (121) |
Machine Gun: 40 + 60 = 100 |
|
Reloading: 25 + 51 = 76 (100) |
Explosives: 0 |

Recommended Weapons:
- Melee: Battle Axe/Katana, Nodachi, Spiker
- Chainsaws: Grinder, Steel 090, Ripsaw
- Machine Guns: Stell Aug, XM8, Chicago Typewriter, K-50M, M4
- Rifles: M1 Garand (or Rebellion if finances allow)
Recommended Armour:
- Strength: SN-42
- Non-Strength: Exterminator Mesh GT
Proficiency:
- Add 5 to Machine Gun Stell Aug
- Add 25 to Machine Gun for the XM8
- Add 10 to Melee for the Nodachi & Steel 090
- Add 20 to Rifle for M1 Garand or Rebellion
- Add 20 to Machine Gun for K-50M
- Add 10 to Machine Gun for M4
- Add 10 to Melee for Spiker & Ripsaw
Stats:
- Add 30 to Endurance
- Add 51 To Reloading
- Add 10 to Endurance
- Add 9 to Critical Chance
The stat allocation this semester may seem confusing and even arbitrary, but there is method to the madness. By following this progression, students should have proper stats in place for each new weapon they equip. Several factors are at play:
- As long as students predominantly use Melee and Chainsaws, Reloading and Accuracy are less important for this build.
- The 50 points in Strength allow use of the XM8 assault rifle, which is less reliant on Reloading and Critical Hit than Sub Machine Guns used in Critical Builds #1 and #2.
- Consequently, Critical Build #3 invests fewer points in Reloading and delays maxing Critical until the Postgraduate period, when the build permanently abandons Assault Rifles for Sub Machine Guns.
- Meanwhile, points are invested in Endurance, and Reloading is raised in time to benefit the K-50M sub machine gun, which needs at least 70 points in order to deliver more effective Damage Per Second than the 70-proficiency Chicago Typewriter (because of its smallerclip size, the K-50M, pauses to reload more often).
Students with Critical Build #3 should arrive in Fort Pastor with a Battle Axe/Katana, a Grinder, an SL8 rifle, and an M16 assault rifle. This weapon combination will be sufficient for looting and low-level grinding in nearby neighborhoods. These weapons will come up short against massive agro swarms and faster bosses (Wraiths, Giant Spiders).
To deal with these threats, students should upgrade their machine guns. After the M16, the next two Assault Rifles - the Stell Aug and the XM8 - offer the same DPS as the M16 (approximately 105 with 112 in Critical). The only improvement is larger ammo capacity: the Stell Aug fires 42 rounds per clip; the XM8 fires an impressive 100 rounds per clip.
Skip the 50-proficiency UMP sub machine gun: with 112 in Critical, the DPS of the UMP is is only slightly higher than that of the 45-proficiency Stell Aug (approximately 108 vs. 105). The Stell Aug's larger clip size makes it preferable despite its lower proficiency requirement.
Along the same lines, the 70-proficiency XM8 cannot match the DPS of the Chicago Typewriter sub machine gun, which also requires 70 proficiency points. With 112 in Critical, the Chicago Typewriter delivers approximately 112 DPS.
However, the XM8's 100-round clip is twice the size of the Typewriter's. At low Reloading, the XM8 will outperform the CT during a prolonged firefight, because the CT stops twice as often to reload. The math is complicated, but with 112 points in Critical and approximately 52 points in Reloading, the two machine guns deliver just about equal damage while firing continuously. After more points are invested in Reloading, the Typewriter is superior. Therefore, we recommend waiting to use the Typewriter until Reloading is well past 50.
A similar situation arises when Machine Gun proficiency reaches 90 for the K-50M sub machine gun. During a short burst, the K-50M delivers more DPS than the Typewriter. However, over the course of an extended round of uninterrupted shooting, the K-50M's smaller clip size (35 rounds) results in less DPS at low Reloading, because of the more frequent pauses. In this case, the K-50M surpasses the Chicago Typewriter when the Reloading stat rises above 75.
(We should parenthetically note that a weapon with higher DPS will always deliver a brief blast with more damage than a weapon with lower DPS, regardless of clip size and Reloading. If a student needs to lay down a few seconds of fire to cover a retreat or to punch a hole to safety, a Chicago Typewriter is better than an XM8; a K-50M is better than a Chicago Typewriter.)
Using Assault Rifles also allows students to delay maxing Critical Hit (which benefits SMGs more than ARs). Shortchanging Reloading and Critical Hit for the time being enables students to begin adding points to Endurance without crippling their build in other ways. Endurance is very useful for students engaging in close-quarter combat with Melee and Chainsaws.
Upon reaching 40 Rifle proficiency, students can acquire either an M1 Garand or a Rebellion. The former fits into the Standard Weapon Progression for Critical Build #3; the latter is suited for the Preferred Version. The choice will not affect allocation of proficiency points until the postgraduate period, so students who cannot afford the Rebellion now, could purchase an M1 Garand for the time being and swap in the Rebellion later.
Both the M1 Garand and the Rebellion have lower ammo capacity than the SL8, but by this time the Reloading stat should be high enough to mitigate any problems.
The M1 Garand is essentially the firearm equivalent of a Battle Axe: it delivers the same Damage Per Hit (85 per Critical) at the same rate (once per second). It is a solid weapon for picking off threats from a distance, but it fares less well in high agro situations, where its Very Slow Firing Speed is a liability.
Despite having a smaller clip size than the SL8, the Rebellion is a tremendous upgrade: the Rebellion does so much more Damage Per Hit that a single clip delivers almost as much damage as the SL8 - and because of the Rebellion's faster firing rate, the damage is delivered more quickly. Even with more frequent pauses to reload, the Rebellion stays well ahead of the SL8 in Damage Per Second.
The Rebellion actually delivers more DPS than the machine guns currently equipped in the build (113 for the Rebellion vs approximately 105 for the XM8 and 112 for the Chicago Typewriter). The Rebellion will focus that damage on individual targets rather than spreading it out among swarms. Nevertheless, it is effective for fighting agro. With this rifle and a chainsaw, students will find that they need not rely much on machine guns. The Rebellion will also prove useful against Wraiths and Giant Spiders (though dodging skills are important since, unlike machine guns, a rifle will offers little knockback against these boss zombies).
When students begin to explore regions farther east of Fort Pastor, it is time to upgrade Melee proficiency to 120 for a Nodachi. Particularly in Red Zones, the Nodachi comes in handy: with Long Arms, Rumblers, and Blood Dogs, the Battle Axe/Katana can take too long to clear the zombies around a loot spot; being able to dispatch Blood Dogs with a single blow speeds the process considerably.
At the same time, acquire a Steel 090 chainsaw. Its 144 Damage Per Second exceeds that of the machine guns currently accessible.
If students stay at Fort Pastor until Level 50, they will be able to max their primary weapon proficiency before moving onto Secronom Bunker. There are several options for 120-proficiency Melee weapons and Chainsaws; we assume that students start with the least expensive options, the Spiker and the Ripsaw G12.
Students will also be able to equip a 100-proficiency Machine Gun (the M4 assault rifle) by Level 50, along with the 40-proficiency Rebellion rifle (which as noted above is the equivalent of a 100-proficiency weapon). This will give students three elite weapons, which should be more than enough to fend for themselves when they make the transition to the more dangerous territory in the far eastern zones around Secronom Bunker.
Because this build reaches Level 50 with an Assault Rifle in place, there is no need to max Critical Chance, which benefits Sub Machine Guns. After Level 50, as students switch to Sub Machine Guns, they can resume adding stat points to Critical.
CRITICAL BUILD #3
COMPLETING THE UNDERGRADUATE PROGRAM
Upon reaching Level 50, a student acquires the Stat & Proficiency points needed to complete Zombie Hunter University's Undergraduate Program for this build - a necessary requirement for earning Bachelor's Degree in Scientific Minimalism. Graduates may hone their skills in Fort Pastor while finishing up their degree requirements, or they may embark upon advanced studies in Secronom Bunker.
The undergraduate versions of Critical Build #3 should be sufficient to loot and grind successfully while deciding whether to pursue an advance course with the same build or stat-rest to a Hybrid.
CRITICAL BUILD #3
POSTGRADUATE PROGRAM
After earning a Bachelor's Degree in Scientific Minimalism, students interested in postgraduate studies may pursue postgraduate studies through the next 40 levels. Progress will be much slower, because only 2 proficiency points and 1 stat point are allocated for each new level.
Advancing to Secronom Bunker is a requirement for earning a Master's Degree. Graduate students may tarry for awhile at Fort Pastor, developing their build further before embarking for more dangerous climes; however, Level 70 is the absolute latest during which students should remain in the outpost. After reaching Level 71, students will require Level 71 food and medicine, which cannot be found anywhere nearby. At this point, looting in Black and White Zones farther east becomes a necessity.
During the undergraduate program, Scientific Minimalism recommended using the minimum weapon needed to defeat local threats. However, in Secronom Bunker, it is wise to equip the most powerful weapons possible. The Bachelor's version of Critical Build #3 will keep students alive while they loot to afford more expensive equipment.
|
Critical Build #3: Standard Version at Secronom Bunker
Levels 51-95 (Postgraduate Program) |
|
|
STATS |
PROFICIENCY |
|
Strength: 50 |
Melee: 120 |
|
Endurance: 67 + 31 = 98 (122) [xx] |
Pistols: 5 |
|
Agility: 100 (124) |
Rifles: 40 + 70 = 110 |
|
Accuracy: 25 + 11 = 36 (60) |
Shotguns: 0 |
|
Critical Hit: 97 + 3 = 100 (124) |
Machine Gun: 100 + 20 = 120 |
|
Reloading: 76 (100) |
Explosives: 0 |

Recommended Weapons:
- Melee: Dual Blade
- Chainsaw: Goretooth
- Machine Guns: Criss Victor, Uziel, Street Dog
- Rifles: Chesterfield, MSG-9, SIC 550, Hawk OP96, M82A2, Dragon SVD, VSS Vintorez, 577 Rex or Corpse Piercer
Recommended Armour:
- Strength: SN-42 (good backup armour)
- Non-Strength: Nomad Mesh, Shinobu Mesh
Proficiency:
- Add 5 to Machine Gun for Criss Victor
- Add 15 to Machine Gun for Uziel, Street Dog, Nine Cutter-X
- Add 60 to Rifles for VSS Vintorez
Stats:
- Add 3 points in Critical
- Add 14 points to Endurance
- Add 11 points to Accuracy
- Add 12 points in Endurance
Implants:
- 2 Rage Implants
- 2 Survival Implants
In terms of Armour and Implants, the Standard Version of Critical Build #3 is identical to the Preferred Version. The only differences is that the Standard Version continues to develop Rifle proficiency to compensate for the lack of a Rebellion.
Before this, students will maximize Machine Gun proficiency. The 105-proficiency Criss Victor offers only a slight increase in DPS over the M4 Assault Rifle, but its ammunition is lootable in the zones around Secronom Bunker and therefore less expensive in the marketplace, where the M4's 5.5 rifle ammunition is in short supply. Students may wish to consider the more expensive105-proficiency Criss Victor - a limited-edition sub machine gun with higher DPS than the Criss Victor.
Students will also purchase more expensive weapons than they could afford in Fort Pastor, even though they had proficiency in place, such as the Dual Blade. Upon arriving in Secronom Bunker, graduate students will be well prepared for looting and grinding in Red Zones to the southwest, but more powerful weapons will be very useful in the Black and White Zones closer to the outpost.
As we saw during senior semester in Fort Pastor, stat allocation jumps back and forth in a way that may appear confusing. Here is what is happening:
- A final few points are added to max Critical at Level 53, just as the build switches out the M4 assault rifle for the Criss Victor sub machine gun, which relies on Critical Hits for its DPS.
- Endurance is raised while the build is using Bolt-Action Rifles, which do not require base points in the Accuracy stat.
- Accuracy is raised in time to achieve Reliable Aim with Carbine Rifles, just as the build equips its first Carbine, the SIC 550 at Level 79.
- Because Reloading is never maxed in this build, the greater ammo capacity of Rifles like the MSG-9 and M82A2 is more beneficial than it was in Critical Build #1.
By Level 90, the Standard Version of Critical Build #3 should hold a Dual Blade, a Goretooth, a VSS Vintorez, and at least an Uziel. It will be virtually identical to the Preferred Version at Level 60, because it takes 30 levels for the Standard Version to equip a VSS Vintorez, which is almost equal to the Rebellion used in the Preferred Version.
By the Level 95, the conclusion of the Postgraduate Program, the Standard Version should have added a 577 Rex or a Corpse Piercer. Both are Very High Critical rifles which require only 80 points in the stat. However, we do not recommend a stat-rest at this point: because both the Rex and the Corpse Piercer are Bolt Action Rifles with Very Slow Firing Speed, we recommend keeping Critical at 112 in order to continue using the VSS Vintorez carbine in crowd-control situations.
When students have raised Rifle Proficiency to 120, they will have access to both Bolt-Action Rifles and Carbines with Very High Critical Chance. At this point, it makes sense to stat-reset.
IMPLANTS
Reaching Level 50 opens up four slots to equip implants for the first time. Several different types of implants are available, but as with stats, it is better to focus on one or two capacities rather than three or four.
A Rage Implant increase inflicted damage by 1%. Two Rage Implants will nudge the DPH of a Dual Blade melee just past 170, making it one of the few weapons that it can one-hit-kill Rumblers in Red Zones.
We recommend Survival Implants, which decrease incoming damage by 1% each, because students using Chainsaws for grinding are more likely to be injured, especially when they encounter Irradiated (exploding) Rumblers near Secronom Bunker.
Boosting speed instead of endurance would certainly benefit Critical Build #3, but on balance we think it is better to decrease the damage that inevitably results from hand-to-hand combat.
In general, we recommend first-generation implants because they are less expensive. For example, a single Violence Implant will increase DPH by twice as much as a Rage Implant, but the Violence Implant cost nearly one hundred times more. You do the math.
|
Critical Build #3: Experimental Version at Secronom Bunker
Levels 51-90 (Postgraduate Program) |
|
|
STATS |
PROFICIENCY |
|
Strength: 50 |
Melee: 120 |
|
Endurance: 67 |
Pistols: 5 |
|
Agility: 100 (124) |
Rifles: 40 |
|
Accuracy: 25 + 13 = 38 (62) |
Shotguns: 0 |
|
Critical Hit: 100 (124) |
Machine Gun: 100 + 20 = 120 |
|
Reloading: 76 +24 = 100 (124) |
Explosives: 0 + 60 = 60 |

Recommended Weapons:
- Melee: Dual Blade
- Chainsaw: Goretooth
- Machine Guns: Criss Victor, Uziel, Street Dog
- Explosives: HK69
- Rifles: Rebellion (carried over from undergraduate program)
Recommended Armour:
- Strength: SN-42 (good backup armour)
- Non-Strength: Nomad Mesh, Shinobu Mesh
Proficiency:
- Add 5 to Machine Gun for Criss Victor
- Add 15 to Machine Gun for Uziel, Street Dog, Nine Cutter-X
- Add 40 to Explosives for HK69; continue adding points for later use
Stats:
- Add 3 to max Critical
- Add 3 points to Accuracy
- Add 24 points to max Reloading
- Add 10 points in Accuracy
Implants:
- 2 Rage Implants (enables Dual Blade to one-crit-kill Rumblers)
- 2 Survival Implants
The major difference between the Preferred Version and the Standard Version is that the Preferred Version uses a Rebellion rifle. With this powerful weapon in hand, investing more points in Rifle Proficiency yields few benefits, because the Rebellion outperforms subsequent Carbine Rifle through the 100-proficiency VSS Vintorez.
Students could continue to raise Rifle Proficiency, in order to equip the Hawk OP69 and M82A2 Bolt-Action Rifles, which deliver more Damage Per Hit than the Rebellion. Eventually, high-end Rifles (577 Rex, Ironsight, XLGunner-8, etc) would outperform the Rebellion. These Very High Critical Chance weapons offer an option to reset stats, moving points from Critical to Strength to create a Hybrid Build.
This long-term strategy certain can work, but impatient students may wonder whether it is worth the wait. Therefore, we propose an experimental alternative: with little short-term gain from raising Rifle Proficiency past 40, the Preferred Version has the luxury of developing a different weapon - namely, Explosives. After maxing Machine Gun proficiency, it will take 20 levels to earn 40 proficiency points for an HK69 grenade launcher, which has a DPS rating of 315 - stronger than the Goretooth Chainsaw and the Street Dog sub machine gun.
The HK69 provides a useful edge for students planning to stick with this build rather than pursue a stat-reset, but its Very Slow Firing Speed and low ammo capacity (one round per clip) demand maximum Reloading and better Accuracy. Therefore, the Preferred Version of the build invests more points in these stats, cutting into the amount of Endurance.
We have never tested this build in the field, so this is not exactly a recommendation. Rather, it is a suggestion for students eager to try something different.
CRITICAL BUILD #3
COMPLETING THE POSTGRADUATE PROGRAM
Level 95 marks the conclusion of the Postgraduate development of Critical Build #3
After Level 95, students using the Standard Version could continue adding points in Rifles until they can equip the 120-proficiency Ironsight and Marksman G8 at Level 100. At this time, students have the option of doing a stat-rest like the one described at the end of our template for Critical Build #1. Moving stat points from Critical to Strength will impair the performance of Chainsaws; students should take this option only if they find themselves exclusively using Machine Guns for grinding after they arrive in Secronom Bunker.
Students using the Experimental Version could continue adding points to equip better grenade launchers. We have not conducted sufficient field tests to determine whether developing a build in this manner will yield better long-term benefits than stat-resetting to a Hybrid Build.
One possibility for students wishing to avoid a stat-reset would be turning Critical Build #3 into a Hybrid by raising Strength, in order to eventually equip Heavy Armour and Heavy Machine Guns. However, this would take a very long time - 50 levels to max the stat.
For the time being, therefore, Zombie Hunter University does not offer an advanced degree with an emphasis in this field. Students interested in pursuing a Master's degree should reset to a different build.
CRITICAL BUILD #3
MELEE & CHAINSAW CORPSE GEAR ALTERNATIVE
Students who prefer to max their Machine Gun proficiency as soon as possible could cap Melee proficiency at 110 instead of raising it to 120 by Level 50. The ten saved points go into Machine Gun proficiency.
This will delay maxing Melee proficiency until later; fortunately, Corpse Gear provides a viable (though expensive) alternative: the Corpse Crusher melee weapon and the Corpse Grinder chainsaw (both 110 proficiency). The hit profile of the Corpse Crusher is almost identical to that of the Spiker (a Corpse Crusher requires four hits to kill a Leaper; a Spiker can do it in three).The DPS of the Corpse Grinder is exactly equal to that of the Ripsaw.
This option will facilitate the move from Fort Pastor to the Secronom Bunker by allowing students to acquire a 120-proficiency Sub Machine Gun sooner. The DPS of most SMGs lags behind that of Heavy Machine Guns and Assault Rifles; in order to be in the same league, students need a Street Dog 99 sub machine gun.
Recommended Build Templates:
- Critical Build with Melee, Submachine Gun, Rifle
- Critical Build with Pistol, Submachine Gun, Grenade Launcher
- Critical Build with Melee-Chainsaw, Sub-Machine Gun
- Survival Build with Melee-Chainsaw, Shotgun, Rifle
- Assault-Hybrid Build with Pistol, Machine Gun, Grenade Launcher
- Hybrid Build with Pistols, Shotguns Grenades

Matriculated
1253772